 Passport


Sew Amazing Scarves - Part 3
10/20/13 | 26m 46s | Rating: NR
Nancy shows her infamous wrapped corner, elastic thread shirring options, embroidery, fringing, and more. Create easy scarves such as the Loop and Tuck, Fringed Folly, and Embroidered Elegance that are chic, stylish, and fun to wear!
Copy and Paste the Following Code to Embed this Video:
Sew Amazing Scarves - Part 3
Welcome to the third episode of my series "Sew Amazing Scarves." Whether you're a newcomer or a seasoned sewist I'm almost certain that I have a style for you. Let's start with the loop and tuck scarf. However you choose to loop or tuck, the fabric stays put. The secret ingredient is the way the pattern is designed. There's no slipping or sliding of the fabric. "Sew Amazing Scarves" that's what's next on Sewing with Nancy. Sewing with Nancy TV's longest-airing sewing and quilting program
with Nancy Zieman is made possible by
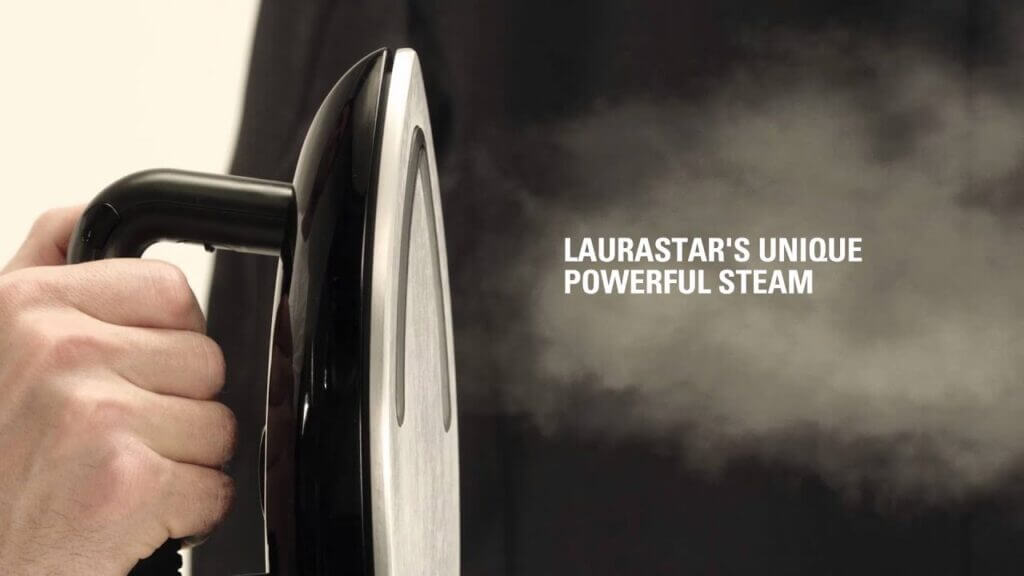
Baby Lock, a complete line of sewing, quilting and embroidery machines and sergers. Baby Lock, for the love of sewing. Madeira, specializing in embroidery, quilting and special-effect threads because creativity is never black and white. Koala Studios fine sewing furniture custom-built in America. Clover, makers of sewing, knitting quilting and embroidery products for over 25 years. Experience the Clover difference. Amazing Designs and Klass needles. I'm pleased to start out the program with this scarf because it's one of my favorites. The loop and tuck scarf has so much potential. It has a variety of ways that you can wear it. The design is quite unique. The pattern shape is a large rectangle with a long handle and a loop at the end, hence the loop and tuck. Bring through a portion of the scarf the rectangle, all of it, which you'll see in a minute, or just part of it. It stays tied, because of that loop configuration. Oh, my, there are a variety of ways that you can wear this around your neckline tight to your neck, draping down the front. It's a great design. In the book that accompanies this program you'll find the pattern. It's basically 13" by 18" and a long handle added to the pattern piece. We used a yard of fabric. If you buy 60"-wide fabric you'll be able to get two identical scarves out of this. So, with a 45" fabric, you'll get one scarf. Cut two layers of a silky type fabric whether it's polyester or pure silk you just need something drapable, as you can see. Cut out two layers. I have a little tape at the corner. I do that, because sometimes it's difficult to tell the right and the wrong side on this so I like to do that in our sewing room. There are four basic seams. Use a 1/4" seam allowance and do some stitching. First, stitch the long angle just with a 1/4" seam, and also the side seam. So, opposite sides, you're going to stitch around. Then to form the corners I like to use a wrapped corner technique. This is something we've done on Sewing with Nancy many times. But if you haven't tried it yet now's your chance! You fold the fabric along the stitching line. You fold it toward you so that the seam is on the fold. Then you place a pin there so that when you sew the seam you're starting to stitch at the fold. Here's a close up of this, starting to stitch at that fold. You'd stitch to the other end. At the other end, you'd do the same folding. You fold the fabric right along that seam and stitch to this end so that the corners are wrapped. If your fabric is a little bit heavier you may want to consider doing a trimming beforehand. I'll show you that in a minute. But here are the sewn wrapped corners. They're kind of crazy looking, but you'll get sharp corners rather than pivoting at the corner. Then you can do some trimming trimming off the excess seam allowance. The trimming can be done with a pinking shears or with a rotary cutter that has a pinking blade inserted. Use a 45mm rotary cutter to do this and it's automatically graded and trimmed. The remaining seam would be to do the longest edge along the top. Again, folding the corner where you have a corner to fold. You leaving one opening, and it's tiny. The opening is at the very narrowest part of the scarf. So through this-- and truthfully, I'm not going to do this right now but through this, you're going to turn the scarf right side out. It'll just take a few minutes of time to do that. It's kind of like the unfolding of that scarf. I have a lot of scarves the same size! Once you do, you can see what this looks like. The edges come out perfectly square because you've done that wrapped corner treatment. They get extremely sharp and easy to press. You'd press all the edges. To create the loop, you could either serge the top edge of this unfinished area or you could turn it under. Then fold under 2-1/2", or pretty close. This has to be serged or turned under. Then just stitch along the fold. Stitch these two together to create the loop. If we go back to our scarf, you can see that the loop does all the designing details for the loop and tuck scarf. Start with a purchased scarf, like a faux pashmina scarf and add texture with elastic thread. I'll provide the sewing know-how you decide the stitching and shirring accents. You'll soon see that creativity is only moments away when using elastic thread in the bobbin. Cassie and Leslie were modeling these scarves. This Roman shirred scarf looks like Roman shades. It has the shirring or the stitching in the vertical position. The creativity is made possible by the elastic thread which we're going to put in the bobbin and a little pressing technique. In addition, the horizontal is more a faux shirring. It stretches out, so it isn't totally shirred but this again is stitching an equal distance away using the presser foot as a guide to get equal widths. Again, the elastic thread does the trick. If you're using one of these inexpensive scarves that you can find in many areas, just do some press marks, first of all. I'll show you the press marks that we do for the Roman shirring, the vertical shirring. The scarf is folded in half and pressed and then folded in half again and pressed and folded in half a third time and pressed. Those press marks are the stitching lines. It's easy to do. If you want the horizontal lines scarves are usually in a package and if you unpackage it, you'll find horizontal marks equally spaced. So that's where we did the stitching at those horizontal marks that just came in the package! You can choose as many or as few to use as stitching lines as you'd like. That's the easy part. You can figure that out according to your own taste. For the thread, we're going to use the elastic thread in the bobbin. It comes on a spool. Most people think you have to put it in the bobbin by hand winding but actually, you can wind it like a traditional thread. It can go through the traditional thread guides and let it wind. Now, to do all the shirring you're going need to have several bobbins because it takes a little bit of thread. You're going to relax the tension on the thread. Notice that I pulled some length. Then do the clipping. If you just clip when it's taut, it's going to spring. You get the idea. I think you can figure that out. Place the thread in the bobbin case or in the drop-in bobbin, as I have it and thread it through the normal tension guides. Don't bypass it, just thread it through but do not cut the length. I'm spending a lot of time on this because this is the crux of the technique. Do not cut the length. Let it drape, so that the thread is long. Set your machine for a straight stitch and then just do some stitching. Straight stitch at about a "3.0" stitch length. You have an extra thread tail. Just do the sewing, a "3.0" stitch length. I'm just going to sew to your heart's content. This is kind of mindless sewing. You need that now and then, just to enjoy the process. I just about have one horizontal strip done. That's as simple as it is. You can add subsequent rows, if you like. As I get to the end, I'm not going to cut the threads but rather, I'm going to raise the needle and then pull the thread away. Notice that there's a lot of tension. Let it relax. Pull it away, so that you have enough thread to tie the threads together the top and the bobbin thread together. If you'd like to make a crosswise shirring scarf you can sew both in the horizontal and in the vertical direction. You could stitch over ribbon. Position the ribbon on your fabric, using a glue stick and then stitch over the ribbon from the right side. Tie those threads. Then the magic happens with the steam of the iron. Pressing from the wrong side of the fabric, just steam it. The elastic thread does its magic by shrinking. There you can see how a shirring effect can be created whether there are multiple rows or single rows stitched over ribbon you have faux shirring, Roman shirring or crosswise shirring on your scarf. Add your own personalized signature to a scarf with embroidery. With a delicate design and a few stitching tips give your scarf a touch of elegance. I don't know about you, but I enjoy wearing scarves. An evening scarf is something I like to put in my tote or bag. If I'm chilled, I can just throw a scarf like this on. You have a touch of embroidery that really adds a little extra class. Tone on tone or monochromatic, which we have here is a nice way to consider embroidery. This scarf is lightweight. It's a purchased lightweight scarf so the embroidery design has to be compatible lightweight, not heavily digitized, not very dense. If you own an embroidery machine, you know about designs. They can have tens of thousands of stitches, or not as many. Not as many would be your choice for this particular project. We're using a border embroidery collection and chose some of the scroll components that go together to embellish the ends of this scarf. So, lightweight is what you'd like. Because a scarf is reversible it flips to the right side and wrong side or the other right side interchangeably you'd like that embroidery to look the same on both sides. You do that by using the same thread that you have in the top. I have a rayon thread in the top as well as the same thread in the bobbin or bobbin case so just wind this thread in the bobbin case. Do use an embroidery needle when embroidering. With a new project of embroidery I always start with a new needle. It saves little runs or puckers in your fabric. Scarves are lightweight so you're going to have to have a stabilizer. When you're just sewing or when you're embroidering you especially need it. Believe it or not, this is a washaway stabilizer. It's not transparent. It looks like a non-woven, but it dissolves in water. It's cornstarch based so it's not bad for the environment. Hoop the scarf and the stabilizer in your hoop. We have the center of the scarf centered with the embroidery together. The embroidery design is up on my screen. It has three thread color changes. But for scarves I don't appreciate as many thread color changes it's just my taste. So I can press a button and you'll notice that the thread colors all become the same color so it will stitch from thread one, to two, to three and I don't have to have any breaks. It will be one solid color. We're just about ready to stitch. I'll lower the presser foot, which I have already done and just hit the green button, and it will do the stitching. This embroidery design takes 16 minutes to stitch. So, you know, as it sews, it's lightweight but you just kind of watch it. It does the work and you get to enjoy it. The setup is what takes a little of the extra time. As this is stitching I'm going to show you the other end of the scarf that already has been embroidered. I took it out of the hoop, obviously. Here you can see that circle design. It needs a little pressing. I started to trim away the excess stabilizer from the wrong side. Trim away as much as you can. Save this, maybe for another sewing project where you need a little stability, perhaps a buttonhole. I have a whole bag of this in my sewing area. Then, immerse your scarf in water. If it's a silk or a wool that's not what you're going to embroider with this particular stabilizer, but this is rayon. You water spot the whole thing. Put it in water. Because I don't have a sink right here I'm just going to show you what happens with this stabilizer that looks as if it's fabric, but it's not. It dissolves. You can see I've started to do this. You just immerse it, and it dissolves away. What you see on the wrong side will be the same thread color on the right side as on the wrong side for a touch of elegance on your scarf. Two fabric tubes create this offset scarf design. It's called Fringed Folly. The fringed ends and the asymmetrical design plus playful buttons, give this scarf very great style. When we take a close-up look at this scarf you'll see that the ends, of course, are offset. There are two different sizes of tubes and that there's a buttonhole but don't be worried about that. If you're not comfortable with buttonholes it's simply created where the two tubes come together. It's an unsewn section. I love this fabric because the yarns are very colorful. I found this great playful button that accents it. You can wrap it around your neckline or just wear it as a single layer but it stays in place and shows off the fringed area. As you might guess, you need fabric that ravels quite easily. Otherwise, you spend a lot of time just trying to fray the edges. You can create it with several buttons or just one. The sizes of fabric that are cut to create this are 8-1/2" and 5-1/2". So, the crosswise width of the fabric you'll cut two tubes one 5-1/2" and the other 8-1/2" by the length of the fabric, either 45" or 60", the choice is yours. If there's a selvage, which will be on woven fabrics you're going to remove that, cut it off and then start fraying. This fabric frays easily. Some are not quite as easy so you may have more or less fringe depending upon how the fabric is treated. After you've fringed or frayed both ends of both pieces about an inch or 1-1/4", whatever the case may be of your fabrics, and you get a pretty little end then meet right sides together of each tube. Stitch the long ends together and make it a very narrow seam. I just used a straight stitch, followed by a zigzag a really narrow width. Then separate the two pieces. That's why I have the pin in there so I could pull them apart more easily. Turn the tubes right side out. You're going to turn it right side out. Then go to your ironing board and press. Most fabrics that ravel will press well because of their fiber content so you'll get a nice, flat piece of one tube and another piece of the second tube. Now you're going to offset these. I'm always a fan of asymmetrical things. You can offset them according to your taste. But when we made this scarf it was 4-1/2" from the fringe to fringe so we offset it by that amount. Then, kiss those folds together. It's kind of a trick. You have to weave a pin from one side to the other because you're not going to necessarily overlap it. You're just going to hold those together. You want to leave room for a buttonhole oh, about 3" or so up from the edge. We're going to not stitch that area. This fabric, as you can see, has three openings for buttonholes. Here, you'll have to determine what opening you'd like to leave. Put some pins to mark where you're not going to stitch. Then, at the sewing machine you can see I have a feather stitch, an open stitch where I'm stitching one half and then the other. A stitch goes in one side and then the other. It's bridging those two pieces of fabric together. Sew on a button. With two tubes and the button sewn into place you can wrap that scarf around your neckline and hold it in place with the button. Make sure you use a fanciful button something that's fun to wear. Your Fringed Folly scarf can be made in an evening of time. Terry Grahl, founder of Enchanted Makeovers was a Nancy's Corner guest over two years ago. Terry told us the story of how volunteers gave women and children's shelters facelifts with fabric, paint, and elbow grease. Terry joins us via Skype to share the inspiring growth of this wonderful organization. Welcome back to Sewing with Nancy, Terry. Thank you, Nancy, for having me. Terry is joining us from Michigan. For those of you who didn't see our first interview Terry, give a little summary of what you do with Enchanted Makeovers, because this is great stuff. Well, with Enchanted Makeovers we're very passionate about handmade while we're doing our renovations. So we want our viewers and donors to really give with their talent. You went into a shelter and it looked like a prison. Here's a "before" picture that shows one of the rooms that you've done. That's pretty bleak. If you're in a women's shelter, this is not a comforting place to be. You really changed them. Tell us how you do that. Well, it really starts with a donor and how they can give of their time with handmade. From that process, you know, it could be with quilts. Through that, we decide on what color. We're passionate about mural artists. We have a lot of communities that make handmade curtains. Through all that talent, it just all comes together into these beautiful spaces that uplift and inspires women and children that they can move forward with their life. Yeah, it's pretty dramatic, what you have done. It's inspiring to see. But you're not just limited now to bedrooms. You've done children's rooms, too, of course, baby rooms. Yes, also nurseries. Of course, you know, we want the children also to know that they matter. It shows in all the work that you've done. How many rooms have you done, can you estimate that volunteers through Enchanted Makeovers have done over the last year since you started? It's a little over a hundred bedrooms that we've done. That doesn't include, obviously we do sewing rooms. It's thousands of lives that are being changed because as the women move through the program unfortunately, there are new women who go into that program so thousands of lives are being transformed. You briefly mentioned sewing rooms because in some shelters, you have created a sewing room. That's a great thing, tell us about that story. We have the sacred sewing room. We're passionate about sewing instructors coming in and really serving with your time and your talent from the basic, you know, making pillowcases to making dresses that are made out of pillowcases and the women giving back also in the program. We've had Rachel O'Neill from Little Dresses for Africa on. The women give back by making these little dresses. That's the whole circle thing that really gives me goose bumps. Yes, we all have to give back even the women that are in the shelter. It's just a great message that there's always someone less fortunate than us. So yes, we want to include that. When you started, you started in Michigan but it's expanded way beyond Michigan. Tell us about the far reaches of Enchanted Makeovers. We have several national sewing chapters. That chapter leader, really, she's responsible that when those pillowcases or dolls, or capes for kids come in that they're brought to their local shelter. But also, they have events so they can bring their community together and make pillowcases, and really unite in that way. We're always looking for other people. If your state is not on our website, contact us. We want you to be involved. This is a great way to get the word out, Terry. You now have a national headquarters, or soon will. That's an exciting story. Yes, we have been truly blessed by the mayor-- Let me say it over again, I said his name wrong. The mayor of our hometown, Taylor, Michigan Mayor Lamarand has donated the house. It has truly been a blessing. He really supports the organization. Not only that, I want to point out that Home Depot in our home town, the Taylor West Branch is donating all the supplies to renovate this home, inside and out. Exciting. Terry, what a great story. We hope to have you back in a couple years to tell more about how Enchanted Makeovers has grown. I thank you for being our guest. Thank you, Nancy. You're welcome. If you'd like to find out more about Enchanted Makeovers go to nancyzieman.com and click on Nancy's Corner. This wraps up our three-part series on "Sew Amazing Scarves." I hope you've enjoyed this series. Watch it again online, again at nancyzieman.com. Thanks for joining us. Bye for now. Nancy has written a fully-illustrated book entitled "Sew
Amazing Scarves
20 Easy-sew Options" that includes all the instructions and four patterns from this three-part series. It's $16.99, plus shipping and handling. To order the book, call 1-800-336-8373
or visit our website at
sewingwithnancy.com/2709. Order item BK2709 "Sew
Amazing Scarves
20 Easy-sew Options" Credit card orders only. To pay by check or money order call the number on the screen for details.
Visit Nancy's website at
nancyzieman.com to see additional episodes, Nancy's blog, and more. Sewing with Nancy, TV's longest airing sewing and quilting program with Nancy Zieman
has been brought to you by
Baby Lock Madeira Threads Koala Studios Clover Amazing Designs, and Klass Needles. Closed captioning funding provided by Oliso. Sewing with Nancy is a co-production of Nancy Zieman Productions and Wisconsin Public Television.
The latest from Nancy's blog

Search Sewing with Nancy Episodes

Donate to sign up. Activate and sign in to Passport. It's that easy to help PBS Wisconsin serve your community through media that educates, inspires, and entertains.
Make your membership gift today
Only for new users: Activate Passport using your code or email address
Already a member?
Look up my account
Need some help? Go to FAQ or visit PBS Passport Help
Need help accessing PBS Wisconsin anywhere?

Online Access | Platform & Device Access | Cable or Satellite Access | Over-The-Air Access
Visit Access Guide
Need help accessing PBS Wisconsin anywhere?
Visit Our
Live TV Access Guide
Online AccessPlatform & Device Access
Cable or Satellite Access
Over-The-Air Access
Visit Access Guide


Follow Us