 Passport


Quick Column Quilts - Part 2
09/08/14 | 26m 46s | Rating: TV-G
Use Nancy’s quick method to make the time-honored Tumbling Tumblers block—turning a traditional quilt into a modern one. Learn to audition fabric, use templates, and stitch with ease! Create a speedy column quilted table runner using hexagon shapes with a template that eliminates the dreaded Y-seam—it’s fast!
Copy and Paste the Following Code to Embed this Video:
Quick Column Quilts - Part 2
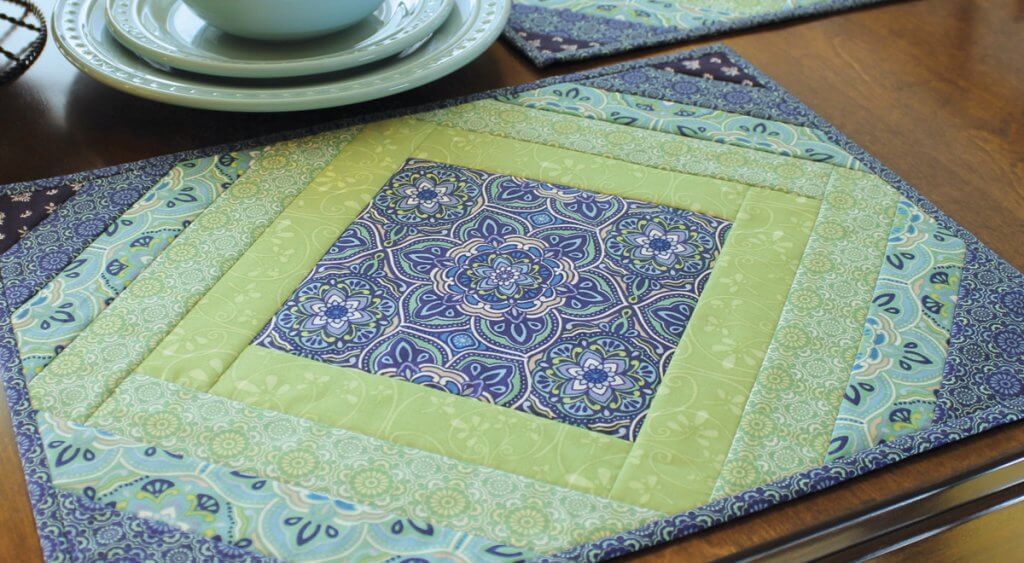
It's time for our second episode of "Quick Column Quilts." Substitute the traditional quilt block with a column or a strip of fabric. The first quilt of the day is called Tumbling Tumblers. Take a speedy approach to this time-honored quilt block by rotating the shape 90 degrees to create columns, not rows. Turn what was traditional into modern. "Quick Column Quilts," that's what's next on Sewing with Nancy. Sewing with Nancy, TV's longest-airing sewing and quilting program with Nancy Zieman is made possible by Baby Lock, a complete line of sewing, quilting and embroidery machines and sergers. Baby Lock, for the love of sewing. Madeira, specializing in embroidery, quilting and special-effect threads because creativity is never black and white. Koala Studios fine sewing furniture custom-built in America. Clover, making a difference in sewing, quilting, crafting, and needle arts for over 30 years. Amazing Designs and Klass needles. A traditional Tumbler Quilt has the template going in this direction with horizontal rows in lieu of vertical columns. Usually, there's only one size of tumbler per quilt but here we've used four different sizes 4", 6", 8", and 10" tumbler sizes. Here's the largest, 10". I think this is the 2". This would be the 8", and the 4" is at the other end. They're separated by columns of the background color. The interesting use of negative space or that green background showing up in the column is because I put several of the tumblers of the same color in succession. It might be a little bit difficult to see but here are the tumbler shapes that create that interesting negative space so the tumblers look like they're tumbling down the quilt. The color choices, I spent a lot of time figuring out what colors to use. Again, it's kind of a modern style, but we used the pastels and then just for the hint of some contrasting pops of color the orange and the plum are used sparingly. If you used it too much it would be a little bit too overpowering. One thing about this quilt, is that when you're making it large or small, you need to audition the fabric. When my staff and I were making this many times we took colors out and put them in. It took a little bit of auditioning so don't be surprised if you find that you have to go shopping to buy different fabric. Let's talk about the templates, how to trace on the fabric. I mentioned there are four sizes of templates that are used 4", 6", 8", and 10". You can print these off. Or often you may find them at your favorite fabric store. You may have them in your stash. Or, I have a template that I'm going to use that has all four sizes nestled in one template. That tells you on this template how long to cut a crosswise strip. So, crosswise strips the one I'm going to be working with is going to be 6". It says on here to cut 6-1/2". You just measure the length, of course, of the tumbler or do what the pattern or template tells you. I have a piece of fabric here. As we did in the first program I really recommend to use a spray starch or a spray starch alternative. You'd do a little bit more than I'm showing you right now. But it gives the fabric some crispness to allow you to really work with the fabric and not have it bend out of shape. Now to do some tracing with a fine point marker. You put the template on the fabric aligning the edges, and trace. Rotate the template, align it on the previously traced line so that you're not wasting fabric. And you keep on keeping on. I think you get the idea of how this works. After you've traced the entire length which I'm not doing right now, but just part of it then you're going to do some cutting. I'll look for my ruler, which is right here. Make sure the fabric is aligned. You could cut several layers at once not just one layer at a time. Cut out the tumblers, it's pretty simple. You're going to do a fair amount of cutting. So, cut away until you have lots of tumblers cut out. Now I have, on the side of my board, the four sizes. Now you do some layout. We started with one column and I'll start with the very smallest, the 2" column. I'll put several of the background color next to each other. There we go, it goes like this. Then, start playing with color. Again, it will not just be a one-shot wonder here. You're going to experiment with what colors work best next to each other. Just keep laying out the colors. Start with one column and then do some pinning to put the pieces together. Because they are not straight edges you will have to offset the little edges by 1/4". I just have a 1/4" marking in this. We'll just do it this way. This is 1/4". I'll be starting to sew in that V of the fabric. Then I place another piece, right sides together. Again, I have that overlap of 1/4". After a while, you'll get accustomed to knowing what 1/4" looks like. Keep pinning and overlapping, and offsetting it by 1/4". This one is really off! I can kind of tell that. We'll check on the other end. You just pin the entire row. You're going to be doing this for each of the columns. I generally start with one column at a time. Now I'll show you tips on how to sew the tumblers together. I have my mini column pinned together. I'm going to double check again that I have 1/4" seam and the dip in the V is 1/4". On my sewing machine, I've placed a patchwork or quilting presser foot that has 1/4" extension along the side. When I raise the presser foot and align the fabric along the edge of the foot then I can just sew that 1/4" seam. As we get to the very end sometimes you have to do a little adjusting as you're stitching. But as I get to this V-shaped point I'm coming right out at that V-shape. Cut your threads and you're ready to stitch the next seam. Then you'd just move on to the next one and sew again with 1/4" seam. Another option would be to pair up your tumbler shapes. This would kind of negate doing that little layout design. But you could place two together and sew them. As I'm coming down the stretch, I wouldn't cut the threads but then I'd place another pair and start to stitch. Then after sewing pairs together then you could certainly lay out the design. This is just a little faster than always cutting the thread. So, you have two options. You can decide what you'd like to do. Pressing is next. Press the seam flat then press it to one side or press it open. I have some larger shapes right here. I'm going to press it flat first. Let me get it right here. Just the way I stitched it, I would do the pressing. And then press it open just the way I recommend in garment sewing you press it flat and then press to one side alternating your directions. Another option is to then set the seam with a wooden clapper, a tailor clapper. You don't have to pound it like I used to do. You just press it so that the moisture comes up through the wood. You get a very sharp crease. In this particular fabric we have a lot of light colors and dark colors. If you press the seams to the light color you might get the show-through. So, this seam has been pressed flat and then I'll press it open. I'm doing this more and more in quilting pressing open seams something that I really didn't do in my early years of quilting. Not having a lot of steam in there and just press a wooden block so that the moisture goes up through this area. You'll find that you'll have nice seams really set fine without having little bubbles or tucks. because we had that 1/4" seam extended you'll find that the edges are very straight or relatively straight. You may get a little hiccup like this but that's pretty common. In this particular panel, I pressed the seams in alternating directions. But again, if you have light colors next to dark colors do that press open of the seams. So, make columns by sewing with 1/4" seam allowances, press with plenty of steam. Set the seams by depressing with the clapper and you'll have great columns. Now I'll show you how to lay them out for a nice design. As you just saw, the stitching and the pressing of the tumbler shapes is really easy. The decisions that are important to make are the placement of the color, the width of the columns which one will go next to which. That's what we're going to do now. Here, I think this looks like about a 6" column to me. I have two of the background colors back to back. Then we would put another column down and separate them by the narrow columns. If we look back at the quilt I'll tell you the widths that I used. Here's that large, 10" tumbler. Next to it is a 4-1/2" narrow column the very smallest 4" tumbler. This is 2-1/2". Really, I just made this up. You could choose any size that you'd like. Here's a 3-1/2" and then by that, a narrow 2-1/2" tumbler. We have seven tumbler columns and we have eight narrow columns. You just lay it out. What you'll find, that we did that sometimes we had to take out a seam or flip a column around to make sure that it looked good together. maybe I wouldn't want all this pink next to that pink. I kind of liked it better this way. So, it will be a very visual decision in this particular case. Then you'll meet right sides together to sew the tumbling columns to the narrow columns. Here is what you'll do next to trim. Because we have 4", 6", 8", and 10" columns or tumblers the tops will not be even. You'll never come out even because of the shape. So you're going to have to have these tumbler columns a little bit longer. After you sew them to the narrow columns then square your quilt. This is a very large quilt. It's fun to work with. You're going to have lots of different pieces. You can see here the visual presentation is fun to work with, just playing and seeing which columns you'd like next to each other. Each of us who makes this quilt will have a very different layout, a very different look. Sue, a professional long-arm quilter did the quilting for me. That's something that I'm not very talented at. You may not be, either. You may want to consider finding a long-arm quilter to do these great circles the starbursts that just kind of make this quilt come alive. So, if you're interested in working with a tumbler but rather than having them horizontal rows you can easily put them in vertical lines for a column quilt that has a lot of impact. At first glance, hexagon shapes cause many quilters to think "Oh, no, the dreaded Y seam!" Not so with this speedy column quilt design. The hexagon shapes are created with two halves eliminating the intersection of three seams otherwise known as Y seams. With this technique, faux hexagon halves are stitched in columns with relative speed and ease. You don't always have to make a quilt. A table runner is considered quilting, as well. You have three layers of fabric, a top, batting, and backing. I like to make small projects, as well as large projects. With this table runner we chose, obviously, a neutral for the background. It looks like hexagons but they're two pieces that have been put together. There's a seam right down the middle. That's why you can get the half of the hexagon. I'm going to show you how to piece these together because you're not going to end up with this dreaded Y seam which normally you have a difficult time getting everything to meet right in the middle. Instead it will all be sewn with straight stitches. You can modify your hexagon templates that you have at home. We just traced these on poster board. Here's the hexagon shape. We cut it exactly down the middle and then added 1/4" seam allowance. This will be the shape that we're going to be using. This is a 4" hexagon shape. Then, you could also use, "or" I should say a template that has half hexagons in it. Here's the 4" size. Much like the tumbling tumblers you're going to cut crosswise strips of fabric. Press it with starch or starch alternative and then do the tracing. I have some shapes already cut here. If you got it before, you'll get it again because this is really pretty simple. I'll just align the edges with the edge of the fabric and the template and trace, and then trace the other side. Then rotate and line up your previous tracing and trace the other side. You get the it, it's pretty simple. You can stack many layers together. "Many," being three or four, not eight to ten! Then you cut along your lines. Use a fine point marker so that you get it as accurate as possible. I have two layers of this fabric stacked. In the instructions that accompany today's program we'll show you the exact number to cut if you want to make this table runner just this size and all the dimensions for the quilts and quilt projects that we're showing. We're going to do the visual layout again. The visual layout is going to include end pieces. If you're wondering what I mean by end pieces on the template that I have there are end pieces that square off the columns which makes it quite a bit easier to get everything exact. On this template there is a finishing piece or an end piece. You would trace this on the background fabric. If you can just make believe this is the background fabric because I ran out of gray fabric! We use so much fabric for this program. You can see that here's an end piece when you flip it around-- We're just kind of making believe that this is gray. I think you've done that before! So you can see these funny shapes. You have to do twists and turns so that you get a straight edge and then an angled edge. Again, it's of the background fabric. You cut double the number that you'd need for the columns that you have. So if you have six columns, you'd need 12 end pieces. Then do some layouts. Here I have a layout that I'm going to start with. Here's an end piece followed by a half hexagon. We call this the Hit and Miss Hexagon table runner. Here we go, like this. You'd lay out your entire table runner. Then as before, you're going to do some pinning together. Meeting right sides together, overlap the two. Then, have that little "kitty ear" extend that 1/4". Make sure it's about 1/4", and pin these two layers together. You'd pin the whole column down the whole column, all the pieces. Meet right sides together, align them. Make sure it's, you know-- you'll get very good at guessing at 1/4". Pin right sides together. You've got it, how that goes together. Here again, I'm stitching that seam starting in the V shape of that seam and just doing those quick little seams. Then you can press the seams as we did before and start laying it out just the way you had the individual pieces but now you have the column sewn. This last step is really important because you have these finishing edges that allows you to align these edges as you put the pieces together. You can see here that I used that option of pressing the seams open. Then, if you align the edges and you align those little kitty ears at the end you'll be able to get a pinpoint accurate seam where the pin goes right through the other side. After I sew this together, everything will line up right at that Y seam. Sew the columns together, put on batting and backing have a friend do the quilting, if you'd like or you can do the quilting yourself and you have a speedy column quilt design as a table runner. A minimal amount of sewing time can make a huge impact in another person's life. Today's Nancy's Corner guest is here to share why and how she developed Pretty Pockets. Please welcome Maryanne Arthur who joins us via Skype, from Maryland. Good to see you, Maryanne. Good to see you, Nancy. Thank you very much for the invitation to share our story of Pretty Pockets. You're welcome. You have an interesting story. It didn't start out with the best circumstances until-- Explain to our viewers your experience and then how you developed Pretty Pockets. Sure, thank you very much. In March of 2011, I had breast cancer surgery. When I came out of surgery I was flanked by four drain tubes and bulbs two on each side of my body. I do have a sample of a drain tube that I'd like to show you. About six inches of the tube goes into your body and the rest of the tube and the bulbs dangle at your side, and hang down past your waist. As you can imagine, these were heavy when they filled with fluid and they're very painful against raw skin. So my ingenious partner Ann Marie ripped apart a pair of our daughter's pajamas and covered the bulbs with each leg of the pajamas. So, from there, I wore the drain bulb covers for the duration of my recovery. A few days after my surgery I went into my doctor's office for a checkup at the University of Maryland St. Joseph's Medical Center and another patient was in the waiting room. She had the exact same drain bulbs. But she had taken all four of her drain bulbs and put them together in a brown paper bag and stapled that bag to her waistband. So, I came right home that day and actually cut out and designed the pocket as a hip, soft, wonderful way to corral drain bulbs. The hitch is, I'm actually not a sewer! So I recruited Ann Marie to sew two pockets for me. She put them together and we delivered them the very next day to Miss Joan at the hospital. She loved them. The folks at the hospital loved them and we began production at home. You don't make a penny from Pretty Pockets. You donate all of your time and energies in spreading the word of these pretty pockets. They're made of nice flannel. They're soft. You just pin them into place. Yes, that's correct. When we were talking about this earlier you were mentioning that since 2011 you've had a lot of contacts. Tell our viewers, it's kind of monumental today as far as this outreach today that happens. It is phenomenal. I cannot tell you how wonderful this story has become from the very beginning in my home to over 500 people who have contacted me in the last four months to receive a copy of the pattern. There were so many integral people who stitched the story of the pockets along the way. I'd love to be able to highlight a few of them if that'd be okay. Sure, of course. Well, beginning at home my partner Ann Marie came up with the idea of actually covering the bulbs. Then her mother Judy is a very avid sewer and quilter. She, for the last two years, has cut, sewn, and produced hundreds and hundreds of pockets that we've distributed. She made a contact for me at the Jo-Ann Fabric store locally with Regina, the sewing manager there. Regina has hosted several sew-ins over the course of the last two years. The sew ins were picked up by a media newsletter here at home, called The Patch. From The Patch in Baltimore a woman in Florida read the article online. Her name is Rob Newton and she runs an online embroidery newsletter for a company called Designs by Sick. She contacted me personally by phone and asked if she could rerun my story and promote Pretty Pockets as a giving project to her 30,000 people on her newsletter list. Wow. It's amazing. Five hundred of those people have contacted me personally. One of them, named Debbie Wright, referred me to you. Well, it's like connecting the dots I'm glad you can give it to other people as well. Not only are Pretty Pockets used by breast cancer survivors but other people with all kinds of surgeries. Yes, that is very true. I was promoting it and even my gift tag says it's a free gift for breast cancer patients. But the more people who contacted me they were asking me if they could modify the pattern for other types of surgery. Some of the drain bulbs are different sizes so folks have taken the pattern and designed whatever they needed to accommodate friends and family members in need. They can just be pinned to your clothes. They don't need to be stapled or placed into a paper bag. You can make them in fun colors, and you put a fun message with them, too. I do, my message on my tag reads "A discreet and spirited way to secure post-surgical drains." It's a charming story, I thank you. I'd like to report to our audience that your surgery was in 2011, and now you're cancer free. I am cancer free, yes, thankfully. That's great news. Maryanne, this was charming. We'll direct our viewers to our website at nancyzieman.com where they can click on Nancy's Corner and view your introduction and go to your website. It's a free pattern, right? It is a free pattern. I saved it in a pdf format, so people can download it. I even saved a template so all you have to do is cut the template out and trace the fabric over the top of that. It's very easy to do. And feel free to modify the pattern according to your own needs. Share it with your friends, don't keep it a secret. Please remember this project in the future because there's such a need for it with so many people having surgery. It's not just for one time a year. Keep all those fabric scraps and create Pretty Pockets. Thank you, Maryanne. Thank you for watching at home. Bye for now. Nancy Zieman has written a book entitled "Quick Column Quilts" that includes instructions for 13 quilted projects and all the techniques featured in this three-part series. It's $18.99, plus shipping and handling. To order the book, call 1-800-336-8373 or visit our website at sewingwithnancy.com/2804 Order Item Number U8743 "Quick Column Quilts." To pay by check or money order call the number on the screen for details. Visit Nancy's website at nancyzieman.com to see additional episodes, Nancy's blog, and more. Sewing with Nancy TV's longest airing sewing and quilting program with Nancy Zieman has been brought to you by Baby Lock; Madeira Threads; Koala Studios; Clover; Amazing Designs and Klass Needles. Closed captioning funding provided by Pellon. Sewing with Nancy is a co-production of Nancy Zieman Productions and Wisconsin Public Television.
The latest from Nancy's blog

Search Sewing with Nancy Episodes

Donate to sign up. Activate and sign in to Passport. It's that easy to help PBS Wisconsin serve your community through media that educates, inspires, and entertains.
Make your membership gift today
Only for new users: Activate Passport using your code or email address
Already a member?
Look up my account
Need some help? Go to FAQ or visit PBS Passport Help
Need help accessing PBS Wisconsin anywhere?

Online Access | Platform & Device Access | Cable or Satellite Access | Over-The-Air Access
Visit Access Guide
Need help accessing PBS Wisconsin anywhere?
Visit Our
Live TV Access Guide
Online AccessPlatform & Device Access
Cable or Satellite Access
Over-The-Air Access
Visit Access Guide


Follow Us