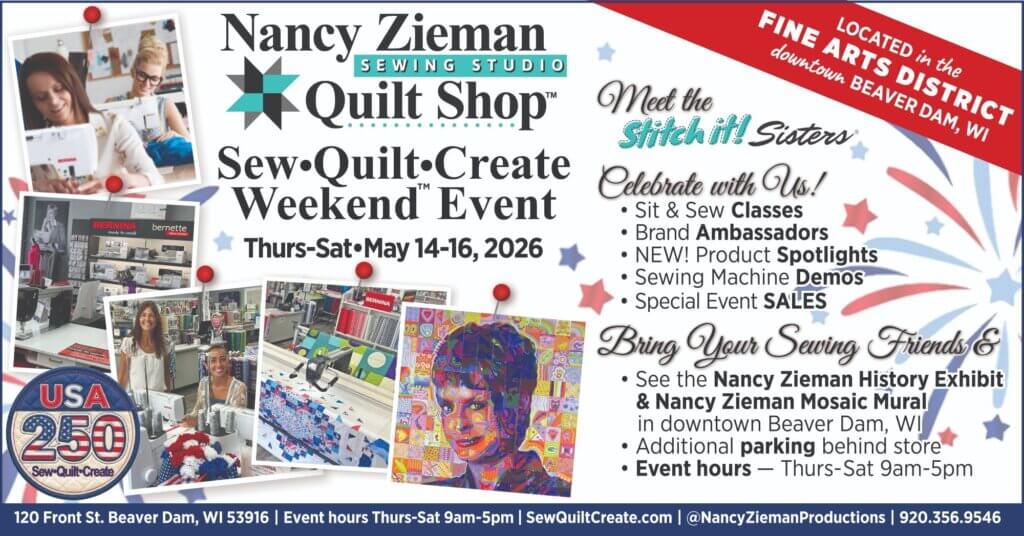
 Passport


Sew Big Quilt Blocks - Part 1
08/11/13 | 26m 46s | Rating: TV-G
Nancy and quilt designer Debbie Bowles use 18" blocks to make large quilts using ideas from Debbie’s versatile BQ pattern designs. Basic cutting and assembly are combined with creative variations such as a T-shirt quilt, cut-up panels, combining 9" and 18" blocks with style, and more.
Copy and Paste the Following Code to Embed this Video:
Sew Big Quilt Blocks - Part 1
When you hear the phrase "so big" you might think of a baby's arms stretched upright. Today, that phrase gets an addendum. "Sew Big Quilt Blocks." I naturally want to spread my arms just to show you the size of the blocks. Debbie Bowles is the designer of 18" quilt blocks that are speedy to piece, but have great impact. Debbie, welcome to sewing with Nancy. Thanks Nancy. I've always been drawn to the large fabric prints. Rather than cutting them up into small pieces all the time I designed some quilts that use 18" quilt blocks. The block is asymmetrical, and it's turned and rotated within the quilt projects, creating drama and movement in all the sizes. "Sew Big Quilt Blocks" that's what's coming up next, on Sewing with Nancy. Sewing with Nancy TV's longest-airing sewing and quilting program
with Nancy Zieman is made possible by
Baby Lock, a complete line of sewing, quilting and embroidery machines and sergers. Baby Lock, for the love of sewing. Madeira, specializing in embroidery, quilting and special-effect threads because creativity is never black and white. Koala Studios fine sewing furniture custom-built in America. Clover, makers of sewing, knitting quilting and embroidery products for over 25 years. Experience the Clover difference. Amazing Designs and Klass needles. Debbie is a new Sewing with Nancy Guest and I've been drawn to her quilts and to her teaching skills because of the simplistic size, the streamlinedness and I like that the blocks are asymmetrical. Thanks, Nancy. This is a huge, huge quilt block, 18". There's a lot of kind of new quilters that would like to make a big bed quilt. This is simply a great project for them because you can see that the block is big. It's just a light, a dark, and a center square. But in this large quilt, what you're looking at is 30 different blocks. Five different darks, five different lights and 30 centers. That's a lot of blocks but it goes together so quickly. We want to show how versatile this pattern and design is that we're going to be showing you during this first program so we have a little showcase to start. This is traditional cotton but this next quilt is flannel. Right, and flannel is such a wonderful product to use but it does become kind of bulky when we do it. This is a great block because there's not very many seams. What you're looking at on this flannel lap-sized quilt is two darks, two lights and four different centers making the design. We're going to be talking a lot about fabric choices during this two-part series, so not to worry. We'll tell you how to do this. But then, fabric choices for T-shirts we're always getting inundated with questions on T-shirt quilts. And this is a great one to use. It is, because when we do think of T-shirts most of the time, our kids or our family members have been doing something active. So it's fun to have them put into a quilt where they're not just sitting there, they're moving around. It's not one block, right after another. They're separated, and as you said, they have movement. Not only can you use nontraditional fabric like T-shirts, and flannel, and cotton but you may also use a panel. So often, you can buy pretty panels of fabric but you can cut them up. Right, and I think sometimes as quilters we get a little stymied. If it was printed as a panel, we want to use it as a panel. This is a great pattern to cut up that panel making dynamic center squares. If you're wondering how we're going to do this well, we'll be showing you exactly how to make this "Sew Big Quilt Block" how to choose the fabric, cut, sew, and how it all comes together, next. Whether you're making a queen size, twin, lap quilt the "Sew Big Quilt Blocks" are all made, basically, with three fabrics. Yes, they are, Nancy. We always have a center square, a dark, and a light. The quilt we saw earlier had 30 different fabrics for the center square so you won't be cutting strips for that. But for the frames, it is a strip quilt cutting. It's a small strip and a larger strip 2-1/2" and 4-1/2". They get paired up and stitched together into a strip set a large white, and a 2-1/2" dark. Then a skinnier white and a dark. One strip is loose and not part of a strip set. Like traditional quilting, when you have strip sets stitch together with 1/4" seam allowances which I'm doing here. At the end of the seam just butt the next strip set to the stitching and continue until you've stitched all of your strips. Absolutely, it's very fast and easy sewing. Of course, you're going to be pressing them. Press to the dark like we press most things when we quilt. These will be long seams. They're going to go the full width of the fabric, so we want to make sure we do an up and down motion not a driving motion because that will curve our strips eventually. Everything's pressed to the dark side the dark fabric, not the dark side!
both laugh
with Nancy Zieman is made possible by
Then we can do some subcutting. We'll have the magic of another mat here. Debbie's going to start with the wider strip. We've already squared one end so that it was easy for her to begin. The wider strip is going to get cut into two different widths for the block. One is an 8-1/2" width, one is a 12-1/2" width. You're actually making a big, big quilt, Nancy. You'd probably cut your strip sets all of the 12-1/2" ones at one time all the 8-1/2" ones at one time. I do like, for my larger quilt projects to use a ruler set that is all from the same manufacturer whether I'm cutting segments or trimming the blocks simply because the pieces are so large that if they're off by a little bit from manufacturer to manufacturer it can make a difference. That's the larger sized piece we're going to cut. We have the smaller sized piece from the two strip sets with unequal strips. From these strips that are equal we're going to cut 6-1/2" segments. We'll need two for each block. You could double your fabric and cut them at the same time. For most of us, that will speed up the process. The problem with cutting at the same time is if you make a mistake, Nancy, it's multiplied. Then you have two that are not correct. So, you would cut yet another segment here, also. Then the last thing is the single strip that is not part of a strip set it's also cut into 6-1/2" pieces. That will match up to everything else we've cut. So the cutting, really, is... It's very fast. Very fast, but it has the most detail in it. Then, to lay it out, to see what this looks like the magic happens. Right, so here are the components for one block. Here's my center square. There's an edge and corner on each piece. Here's the shorter piece. Here's the longer piece. The very last piece, that wasn't part of a strip set that's what creates the frame. I have something stitched together here. You would sew together the right side. Correct, and we're going to press it to the dark on this piece. Down here, we're going to press to the dark. Over here, we actually press to the light fabric because these two seams need to interlock to make a smooth transition for that frame. We can show our viewers what Debbie means by this. Pressing is as important as the stitching. Here you've sewn. Let's unpin this a minute, so our viewers can see. You've sewn the right side. But then, when you meet this together this is that continuous seam that you want to keep. Here it's been pressed to the light side which normally, you wouldn't do that. Especially when you're working with very light and very dark. It is more important to have the seam align perfectly. Because of that staggered seam allowance, it will align. Right, it's easy to pin together. Sometimes, when the seams are so easy to do we tend to not want to pin them because we can just hold them in place. This is not one of those times. You really do want this to line up. Because you've pressed them as you have your fingers can feel how it goes. Yes, I like to call it a seam kiss. So here's a block. There it is. It is dramatic. You're going to see later, as we put this together how they can be rotated, they can fit together. Here's how it overlays. Although these are slightly different fabrics than what was in this. If we just lay this up, you can see how it could have been a portion of this quilt and how it goes into that. We have one fabric color combination here. Yes. But you're not limited just to one dark, one light, one center section. Exactly. I wrote that pattern fabric requirements to make it easy for quilters to make a multi-fabric quilt. These are some examples of some beautiful fabrics that could be center squares that would go with anything we showed you in the main quilt or the blocks that we showed you earlier. Browns, rusts, oranges, anything. Quilters have often used this project to feature their collection. Everybody has a color collection. If you've been around the block a while. When working together, with the darks they don't have to be all from the same collection. Correct. What we're looking at here is five possibilities that I would perhaps put into a quilt. Then I brought one that really didn't quite go. It's brown, it's mottled but it's a little bit lighter than everything else. I wouldn't probably use it unless I added another one. So if you're going to have something light then make sure you have two of the five. And then the lights. The same concept, Nancy. These are all similar to each other. Then I've also added in one that I probably wouldn't put with this grouping because it's a little green. So be cognizant when you're auditioning fabric that they blend that they have a little distinctiveness. Right, and I always like to throw in a little pattern. On this one, I've got this little pattern. Over here, I had one that was a little stripy. It gives you great versatility in this wonderful pattern. With most quilt designs there's maybe one or perhaps two layouts that you can have with the quilt block. But with an asymmetrical block, not so. Exactly. So, we're going to look at just four blocks done in a pretty popular colorway. All different center squares all the same lights and the same darks. Were going to put them up, showing you just some really easy block rotations that you can do. Nancy is going to put her center square to the outside on top. I'm going to put my center square to the inside corner. Then were going to each do the reverse of that for our second block. Mine is going to go on the outside, hers is on the inside. So this is one section of four blocks. It will look like this when it's done. This is kind of random for some people so let's put them in what I call the marching look. Nancy, if you would rotate your block to the other corner the inner corner on the left now we've got three blocks that were going to march in a large 30-block quilt. This would march all the way across, diagonally. Sure, I like that. Let's turn this one more time and put that on the outside corner just to give an example if you decided to put your blocks together. Rotate it one more time, Nancy, to the lower corner. Now they get a picture of what it might look like if they end up putting the frames touching each other. It's an entirely different look. It really puts each quilter into the design seat for their quilt, which is something not very common. Right, right. This has such possibilities. As you saw earlier, some of the quilts have movement and that's what I like about this. Exactly. So, rotation and positioning, audition your quilt blocks before you stitch them together. "Sew Big Quilt Blocks" are not just for traditional fabrics. That's right, Nancy. T-shirt quilts are so popular, and as you mentioned earlier, they're usually one T-shirt pattern after another, or panel. But this has great style. And great movement. With your T-shirt, you're going to cut it apart down the side seams. Add a knit fusible interfacing behind the logo. The block size stays the same. It does. Many T-shirt emblems fit beautifully into this 12-1/2" square. So this ruler helps me get things aligned. This is the 12-1/2" mark. Later, you'd go in and use your rotary cutter and ruler after you've marked the corners. Well, you know what I mean. You'd mark the corners so you know exactly where you would cut the block size. Exactly. You have a block already cut. We do. This is also a good time, Nancy to talk about directionality of your prints. Because as we just showed them, the blocks can be rotated. This is what I would call the orientation of the block throughout your stitching process. But if you look right over here now the block is in a different corner. How are you going to decide if you want your blocks to all read right side up? The best way to do it, is you go to your design you put your blocks into the position and then put your bottom and side onto the quilt block as you'll need them. This is actually how you would want this block for this. Nope, I don't think so. I did it wrong? It's that one? Well, anyway, that's how easy it is to make a mistake. You can put a block in each of the four corners which this little sample shows. Exactly. So, T-shirts, back it with knit interfacing. Make sure the orientation is done. Even though we're calling this "Sew Big Blocks" you can also call it "kind of big blocks." Right, exactly. The project also includes a 9" version of the big block. It's the exact same stitching. There you go, slide it a little further. It's the exact same stitching. Everything is just half-sized, Nancy which is a very fun thing to do for smaller projects and also just to mix it up a little. This one is different for another reason. Two colors. It's only two colors two beautiful colors, pink and black. Here's a block. It's got a black center. The pink is the light and now you have a dark frame on it. Right next door, you've got a pink center, a pink frame and now the dark is touching. So, very different in your fabric selection but a lot of really uptown drama. So, you make two. You make negative and positive. Exactly, that's what you're doing. Of each of them. So, we'll unveil the next option. You saw this quilt earlier when we were discussing the potential that you can work with. The panel, exactly. Now we're going to show you the panel that it actually came from. I'm just going to put it up here because I think you can see that there are four different blocks. But this is how it started. It's a beautiful panel spiky, long, I call it radiant star. But how was I going to use it? Let's put it back on the design table to show them some ideas for cutting into a large panel. We know going to be cutting 12-1/2" squares. Oftentimes, I spent way more time deciding how I'm going to cut it because there's only one piece of fabric here. So, I do preview, okay, if I cut it like that then I could also cut the other piece like that. I'm going to lose some of my tips. It's just a matter of going through what are you going to have to cut apart and what are you going to sacrifice, I guess is what it amounts to. Now, some panels are squares that are pre-made aren't exactly 12-1/2". There's oftentimes beautiful printed batik squares hand-done batik squares that you have picked up along the way at some great quilt show looking for great pattern. This pattern, because it does call for the 12-1/2" square none of my little batik panels were even the right size. They weren't even all the same size. I simply added a very small frame, or a larger frame depending upon what it needed to round them out to 12-1/2 inches. I could've redrafted the pattern but that would be crazy. No, just add a little frame. Now, for some drama for the end because now you can combine 18" and 9" squares. Tell us about this quilt, Debbie. This Roses quilt by my friend Heide Burger is just fabulous, isn't it? It is the same quilt block. She's done 18" size and the 9" size. She's also changed up some of the fabric combinations but she used the same roses fabric throughout the quilt. As the accent block. Exactly. You can see the 18" block with different colored borders or frames and then the 9" block. The layout is so wonderful. It's very fluid and really makes your eye move across the quilt. So, with a little construction know-how of cutting, stitching, and rearranging the frames around these magnificent focal point blocks you have many options with Debbie's great design pattern for a quilt. We all love a success story. Today's Nancy's Corner guest and his business partner had a mission to turn textile waste into fair wage job opportunities. They've turned their dream into a business that up cycles clothing and creates jobs with dignity. Please welcome Ross Lohr from Project Repat who joins us via Skype from Massachusetts. Welcome Ross. Thank you so much for having me. This is a great story. Tell our viewers the history behind Project Repat. Sure, so I was running a non-profit organization in East Africa and I was stuck in this terrible traffic jam. When we got to the front and finally found out what caused the accident it was an overturned fruit and vegetable rickshaw and it was being pushed by a Kenyan man who was wearing a T-shirt that said, "I danced my butt off at Josh's Bar mitzvah." So, we started thinking about, well is there some way we can take all these T-shirts that end up in a place like East Africa and turn them into something else. Behind you is an example of that. Yeah, exactly. Behind me is one of the blankets were able to make here. Customers send us their T-shirts and we turn it into something else for them. You are located in Massachusetts which was a textile town many years ago. Absolutely. Tell us about how you work with clients to give them a fair wage job. We have several different production facilities all based in Massachusetts, all based in the USA. We work up in Lowell with a woman who lost her job working at a textile company. She's been able to start her own cut and sew company. We work at a non-profit that employs individuals with disabilities. We also work in Fall River, Massachusetts which is a gateway city a former hub of textile manufacturing here and a leading manufacturing company there. All of our work is contracted out to those companies. You're quite an entrepreneur. Thank you. It's very clever. I was humbled by the fact when you told me how much textile waste is in the stream. Yeah, I was a little shocked myself to find out that 5% of material waste or trash on earth, is used textiles. The average American trashes 65 pounds of textiles every year. Ouch. So upcycling and using what we have is really so important. As you mentioned, you work with many at-risk people to help employ them. Yeah, we feel like the best thing that we can do is provide people with a job that pays them a fair and living wage to do this kind of work. There are so many individuals out there who know how to cut and sew and we want to be able to give them jobs and give them the opportunity to make a good living. This is a relatively new business. Tell us when this started. So this started, we launched this in March 2012. We're taping this in the end of March-- the end of 2012, excuse me. So, in this short time, tell our viewers the number of customers you've had. We've had more than 3,000 blanket customers in a very short period. That relates to a lot of textiles that you've kept out of dumpsters. It does, and it also tells a story how people have so many T-shirts that they love and have a lot of memories associated with them and they want something to do with them and they want to put them all in one place. This is kind of serendipitous but in today's program, we had one little segment of how people can sew with their T-shirts. But if they have so many this is a great way of having you work with them. T-shirts aren't the only thing you do. No, you know, we'll take flannel shirts. We'll take dress shirts anything with a fabric that we can sew. What has been your most challenging thing or time about starting this business? I think we got a lot of customers really quickly. In one week, we had almost 2,000 customers for a deal we did. You're talking about so many boxes of T-shirts coming into our office every week so finding a way to fulfill all that keep track of everyone's T-shirts make sure that they come back in a good amount of time. We were able to find a lot of great production partners who could really help us out and were able to produce these for us. Well, Ross, this is an exciting story. You work with your business partner, Nathan, correct? Yes, that is correct. You kind of feed things to your cut and sew people and then you ship them back to the customer. Yeah, and we try to make it really easy for the customer so that when they buy they get a box with a prepaid envelope in it. So, really, all they have to do is just put their shirts in. All the shipping's on us. They send it off and four to six weeks later back comes a new blanket made out of their shirts. Well, thank you for sharing this great story because it's a great way for people who have sewn for a business now can again sew. You're a great entrepreneur, and I thank you for sharing. Thanks for being with us. Great, thanks so much for having me, Nancy. You're welcome. For those of you who would like more information on Project Repat, you can go to nancyzieman.com and find all things Sewing with Nancy there. Next week, we'll be back with our second program of "Sew Big Quilt Blocks" with our guest, Debbie Bowles. Thanks for joining us. Bye for now. Debbie Bowles has created a pattern that serves as the reference for the "Big Quilt" blocks featured in this program. It's $7.99, plus shipping and handling. To order this pattern, call 1-800-336-8373
or visit our website at
sewingwithnancy.com/2701. Order item MIQ705 "BQ Big Quilts Pattern." Credit card orders only. To pay by check or money order call the number on the screen for details.
Visit Nancy's website at
nancyzieman.com to see additional episodes, Nancy's blog, and more. Sewing with Nancy, TV's longest airing sewing and quilting program with Nancy Zieman
has been brought to you by
Baby Lock Madeira Threads Koala Studios Clover Amazing Designs, and Klass Needles. Closed captioning funding provided by Oliso. Sewing with Nancy is a co-production of Nancy Zieman Productions and Wisconsin Public Television.
The latest from Nancy's blog
Search Sewing with Nancy Episodes

Donate to sign up. Activate and sign in to Passport. It's that easy to help PBS Wisconsin serve your community through media that educates, inspires, and entertains.
Make your membership gift today
Only for new users: Activate Passport using your code or email address
Already a member?
Look up my account
Need some help? Go to FAQ or visit PBS Passport Help
Need help accessing PBS Wisconsin anywhere?

Online Access | Platform & Device Access | Cable or Satellite Access | Over-The-Air Access
Visit Access Guide
Need help accessing PBS Wisconsin anywhere?
Visit Our
Live TV Access Guide
Online AccessPlatform & Device Access
Cable or Satellite Access
Over-The-Air Access
Visit Access Guide


Follow Us