 Passport


10-20-30 Minutes to Recycle Jeans-Part 1 Encore Presentation
12/18/17 | 26m 47s | Rating: TV-G
Don’t junk those old jeans! Nancy shows you how to use deconstructed denim jeans in a variety of new ways to decorate your kitchen. See how durable potholders, pretty placemats, a stylish casserole carrier, and darling bibs are all constructed using the 10-20-30 Minutes to Sew philosophy.
Copy and Paste the Following Code to Embed this Video:
10-20-30 Minutes to Recycle Jeans-Part 1 Encore Presentation
Sewing-- for me, it's a creative outlet and my favorite therapy. I enjoy spending time in my sewing room at the end of the day. Ten minutes here, 20 minutes there is how I accomplish most sewing tasks. If you've been a loyal Sewing With Nancy viewer, you know that 10, 20, 30 minutes to sew or quilt has been a topic before. Now I'm applying that concept to recycling jeans. In one hour, create a pair of durable, recycled jean potholders that are pliable and easy to use while giving protection from the heat of the hot dishes. "10-20-30 Minutes to Recycle Jeans"-- that's what's next on Sewing With Nancy.
gentle instrumental music
female announcer
Sewing With Nancy, TV's longest-airing sewing and quilting program with Nancy Zieman,
is made possible by
Baby Lock, a complete line of sewing, quilting, and embroidery machines and sergers.
Baby Lock
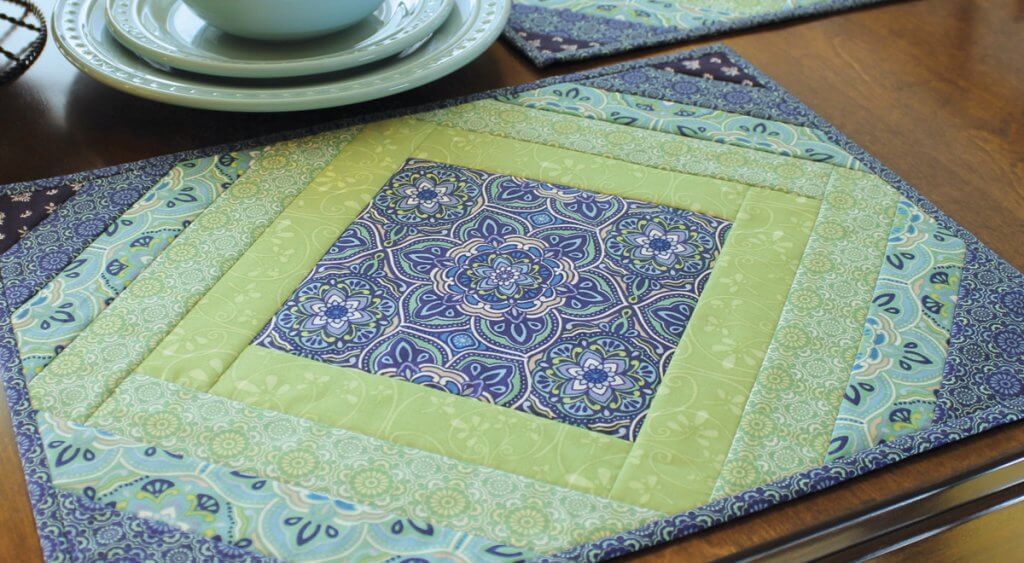
For the love of sewing. Madeira, specializing in embroidery, quilting, and special effect threads, because creativity is never black and white. Koala Studios, fine sewing furniture custom-built in America. Clover, making a difference in sewing, quilting, crafting, and needle arts for over 90 years. Fuller Brush vacuums, dedicated to keeping homes clean. Amazing Designs and Klass Needles. A no-longer-used pair of jeans created the two potholders we had, created from the back of the jeans, you can see, and then we have interesting lining. And there's batting in between that we'll talk about a little bit later. When deconstructing a pair of jeans, you'll find out that you'll need a variety of seam rippers to work with. Clear thread is my choice of doing the stitching or topstitching because we want to maintain the stitching of the pocket, that interesting color. Make sure you use heavy-duty needles such as jeans or topstitching needles, size 90 or 100, and then a sharp pair of scissors. The pocket for the-- the size of the pocket-- or I should say, the pocket panel for the potholder is 8x9. You have to do a little measuring. You're not working with flat fabric. And it'll take you, mm, 20 minutes or so to deconstruct the jeans, to measure 8" in width, 9" in length, to figure out where that's going to end up, where the pocket is going to end up. It may be necessary to release some of the labels, the belt loops, and then mark and cut out your jeans. Then, ten minutes or so, you'll spend time cutting out the elements that go with the jeans, and that is the lining, the same size that you have as the pocket, and batting, and insulated fabric that will enable you to use this as a potholder. Cut a little bit narrower and a little bit shorter than the actual pocket, and then you may want to clip off the corners so that you don't have the bulk in the batting that you would have normally, 'cause it's pretty thick fabric. We had you use denim needles or topstitching needles. That's because of the thickness of everything. So here's the batting unit or the lining unit. And on the top, you can possibly see, we've already pressed under 1/2"-- 1/4" would be fine-- and added double-sided basting tape across the top. Don't take that off just yet across that folded edge. Now, you meet right sides together-- the right side of the lining unit and the pocket. We've-- you could put a belt loop or two centered across the top to use as a loop for the potholder and meet right sides together and then just sew the side seams. That's your first seam, just from top to bottom of the side seams. This is truly recycling. As you can see, I have a little patch in there. Then after sewing the side seams, we're gonna sew across the bottom and a little bit across the top. If you've watched Sewing With Nancy before, you know I like to wrap corners. Fold the seam allowance to the inside so that the stitching line is right along the fold. That way, you sew in a tuck, and it enables you to turn this right-side out and create a very sharp corner. So at the top, I'm going to turn under the seam allowance and pin. And then you can see that this is very thick. So I-- at the sewing machine, I'm going to use a leveler to level the fabric and the presser foot. Here you can see that I'm sewing that wrapped corner down the sides, and then I do the same at the lower edge, all four corners of this pocket, and sew the lower edge of the pocket. When you turn this right-side out, you can see that it will take you about, oh, I'd say 20 minutes to assemble, do all the sewing of this pocket, and then remove the double-sided basting tape, the protective covering. And this is certainly optional, but it does help you pin these thick layers together. And then rather than pinning, you have the tape holding it together, and topstitch along the top of the pocket. And here you could use your monofilament thread or thread that matches your jean fabric. If you really want a speedy method of doing this, rather than using a seam concept, you could meet wrong sides together of your jeans. It would not be necessary to fold under the top, and then topstitch, oh, 1/4" from the edge, and that's what we've done here. The edges are raw but look a little interesting because, in advance, I've already trimmed these off using a pinking blade, or you can use a pinking shears to cut this off. This is totally optional, but you can see, I've already done that. And you can see the edges are trimmed. Talk about a fast way of doing it. It's-- with the raw edge. Of course, you'd have to be a little careful around the belt loop. You can add that after the fact. But you can make a potholder or two in about an hour of time using denim and interesting fabrics. When it's chow time at the ranch or, most likely, lunchtime at home, make adorable bibs for your little buckaroos. The durable yet colorful bib features parts of a cast-off pair of jeans and a bright bandana. Sewing time for this recycling project is, again, about an hour. This bib is a perfect size for toddlers, and you can see, it has a fun look to it-- made with two different pairs of recycling jeans. We're using a leg of a pair of pants that we're-- it's cut off from the jeans that we've used in another project for this show. You can feature the flat felled seam or just a traditional seam down the front of it. Look for little-- always to not-- to avoid in your project. And then fold the fabric wherever you'd like the center seam to be. The pattern that you'll receive has the shape that you'll cut out, the bib, plus lining, whether it's from a bandana or just fabric. When you're going-- taking these two fabrics together, meeting them right sides together, you're going to sew around the neckline edge. Now, I kind of bypassed the timing, but I found it took, oh, maybe 20 minutes to cut out my jeans, to cut out the lining pieces, and then when I-- that could be one project. I could step away from the sewing room, and then the next thing could be to do some sewing. Stitch around the neckline just with a 1/4" seam allowance. To keep that lining on the underside, we're gonna understitch. Press the seam allowance-- finger-press it toward the lining and then stitch. And here is a close-up of stitching the seam allowance to the lining. I do some topstitching to do this, and it works out really well, just keeps it nice and to the back side. As you can see here, you can't see the lining, but when we flip it to the wrong side, you can possibly see that stitching that I just did around the edge. Another stitching step would be to meet all these edges together. Meet the lining, the jean's edges together, and a presser foot width, just topstitch the layers. And we have used red thread here to do the topstitching and stitch all the way around. For the embellishments of this bib, we're going to use a child-sized pocket as an appliqu. And this appliqu concept is used over and over again in this two-part series. You roughly cut out a pocket-- this is a bigger size, of course-- roughly cut it out, and then trim the excess seam allowances away. And I like to bevel my scissors, holding it at the same plane as the pocket, and trim around, so you maintain the pocket's stitching-- you don't have to take out that stitching-- and you just trim. This is all raw edge. And on the inside, do the same thing. To get rid of the bulk, trim away. And again, bevel the scissors and just cut, cut, so that you cut off-- out the extra fabric. Keep this technique in mind, 'cause we're gonna use it a lot. Here, you find a place where you'd like the pocket to be, and you position it and topstitch. You can topstitch this on using clear monofilament thread, as you can see right now. That way, the new stitching does not interfere with the topstitching that's already there. In the bobbin, use matching thread to the fabric. We have a cute little tie that's in the pocket, and you could spend about ten minutes here and another ten minutes to do an appliqu. To make this little tie, cut a four-- excuse me-- a 5" square of fabric. Fold it in half and sew the long edges together, as you can see. And then do this quick little fold, meeting the fold to the stitching line, and do one stitching across the end. That's what we have here, that little stitching across the end, then turn this inside-out. And it magically forms a little pleat and a permanent tie. So you could stick this inside your pocket, if that were stitched, and, ta-da, you have a cute little accent. We've used paper-backed fusible web to create an appliqu using standard techniques of fusing the web to the fabric, cutting out the star shape that we'll give you, and zigzag or just press. So working with cutting out the jeans in about 20 minutes, sewing the appliqus in another 20 minutes, and some of the stitching around the edges, you can create this great project. And do a final cut, cutting around the edges with a pinking shears cutter, and you have your little buckaroo all dressed for dinner. Team up your casual meals with upcycled jeans placemats. The barbecue placemats are durable while adding a down-home flair to a meal with family or friends. Two placemats can easily be made from a no-longer-worn pair of jeans, plus there'll be extra fabric left over to use in other recycling projects. Our barbecue placemat has three different panels. And often you have to choose a flat section of the jeans in order to create a flat section of fabric. Because of kneed-out jeans or the shaping, you don't have a lot of yardage to work with, so you have to be creative in this. And see, we've used a pocket from one pair of jeans, the legs from the other to create the yardage, and then some ticking for the back and also for the napkin. Now, the top and lower edge has a fold-under edge that exposes the flat felled seam, and that makes it easier to sew, and I'll show you how. We have a portion of the jeans that are here, and I've cut about 1/2" beyond the flat felled seam and cut two panels that are 4 1/2" x 18". You can make these any size you'd like, but 4 1/2" x 18" is what we use. And then a flat section that you're going to create is about 8" x 18", and you can see, you can mix and match denim from jeans and sew the units together. This section at the top is what-- it's kind of key to make this easy. The backing fabric is cut the same size as the placemat. Your placemats may vary by 1/2". That's just fine. And it will take you, I would say, about 20 minutes to cut out all these pieces plus cutting out the ticking or the lining. Then press or finger-press under the seam allowance and add double-sided basting tape to both top and lower edge and press securely. And that's what we've done on this side of the jean, so it's pressed under. We like to meet right sides together of the lining to the jean fabric and stitch the side seams. You're going to have extra fabric from the lining sticking out, and you could press that under following the jeans just exactly at the same length. So you could-- and I'm just finger-pressing right now, but you get the concept. It's easy, fast sewing. Then after doing the stitching of the side seams, the top edges are open. So to create the finished placemat... The lining has been topstitched-- or, excuse me-- has been pressed under, and then we just remove the double-sided basting tape. And sometimes you just have to hold it-- the tape down to expose it, and it works as a pinning alternative, 'cause the fabrics are thick. And then you fold under these edges and match them up. And you can see my fingers are stitching-- sticking. It's very tough. So you match up these edges and topstitch. Now, the pocket is put out in the same way that we've done in previous projects. Just topstitch through all the layers, if you'd like. And on our finished placemat, we used a belt loop. Removed one belt loop, centered it, and 1" below the center to attach the frayed-edged napkin. Or you could use an existing napkin that you have. So the barbecue placemat, great for indoors, outdoors, and a great way of recycling jeans. Eclectic in style with a novel utensil holder, this casserole carrier will become your favorite hot or cold food container. Combined with insulated fabrics, it can be made from an adult pair of jeans in approximately two hours of time. We'll take a close-up look at our hot and cold carrier. Back of the jeans is the pocket area, and then there's a second interior, little bit wider, that uses the hemline edge of a pair of jeans, and a 9x13 casserole carrier-- or pan can fit in here. A hot or cold pack can be placed underneath, and you have a very interesting conversation piece for a carrier-- with webbing to carry it to and from your fun outing. Adult pair of jeans that are cut apart, one leg down the center front, the other leg down the center back, and then that opens up fabric for you. Now, the pocket, the top area can either be featuring the back pocket or the front pocket. It doesn't really matter. You're going to cut from this panel...
murmurs
Baby Lock
Make it flat. You're gonna cut a piece of fabric that is 11x40. So we've used the back in this instance. But as I said, it doesn't matter at all. You can use whatever you'd like. Keep the shape of the waistband. Don't square that off. It doesn't matter if that is not square. But cut an 11" x 40" length all the way down. Now, for the underlay that is a little bit wider, you're going to cut a piece that's 15" x 31". So we'll open up our fabric again. And we have a little hint here. Sometimes the fabric doesn't lie flat, so we've just made some tucks in the fabric. You could stitch that down and align one of the 15" edges with the hemline, make it a little bit-- use that hem. Whether it's ragged or not, you can use that. Now, if your fabric is a little bit shorter, a little bit narrower, you can make it 14 1/2". It doesn't matter. The quilted fabric is cut the same size as the panel. There are two panels but 1" longer-- longer at the hemline, which I have here, and longer at the waistline. And you're going to place a strip of hook-and-loop tape on both the quilted area and as well as the jeans, and you'll see that in a minute. So here, I've met right sides together of the jeans and stitched the side seams. If you'd like, you can curve the edges. I think that makes it much faster to turn it. And at the top, I'd like you to notice what we did. We cut the quilted fabric 1"-- 1/2" to 1" longer, and then folded under the edge so that it was easier to accommodate to turn this right-side out, bulky seams. But when you turn this right-side out-- which, you can see that that edge, then, is even, and we just could match those edges, as we did with the placemat. This is really kind of cheating sewing, but it's fun sewing. So here we have the pocket panel, and we would turn under the edges and meet and just topstitch these together, so you can maintain that great shape of the waistband. And you'd make it more readily available-- or readily even, as I haven't done right here. Then, you're going to work with the inner panel. Again, the same thing-- cut it 1" longer or 1/2" longer, meet right sides together-- which, I had it right the first time-- make right sides together, round the corners, and leave that extra 1" at the top. And you're going to wrap it around, so that when you turn it right-side out, it just turns very easily. So here we have the extra fabric that's going to be on the interior, and we can mark where the straps are gonna be. You can topstitch straps into place. Let me just show you this on our finished project. We got lots of fabric flying around. But we have the webbing attached, stitched, and then about two yards of webbing about a foot apart to stitch to the wider panel. And then after you've stitched that into place, you center the wider panel on top of the other panel, and then you can close it up. You can close it however you'd like. You can see, I'm roughly putting this into place, but it's big pieces that are lined with the quilted fabric. They're turned right-side out and overlapped, and a webbing is added. A great gift-- a great hostess gift to take to a picnic, a barbecue, or a tailgate party. During today's Nancy's Corner segment, I get a personal lesson on longarm quilting. Please join me. Quilting is a time-honored art and tradition, but now there are high-tech innovations that change the look of quilting and the speed of quilting. With me is Kay Capps Cross, longarm quilter, fabric designer, author, educator. You do it all, Kay. But this-- Kay, this is especially-- longarm quilting is for you. Yes, I absolutely love it. It's changed quilting completely for me. Longarm quilting used to have a stigma attached to it. Yes, that it was cheat-- - Exactly. Cheating, mm-hmm. - It was cheating, yep. We were accustomed to stretching the quilts out on that big wooden frame, stapling it down, and then either tying it with yarn or sitting and hand-stitching. Right. Well, we don't all have that time anymore. So having a machine like this allows you to finish way more quilts than you ever could hand-quilting. And the style of quilting has changed too-- not all feathers, not all scrolls, but some linear designs. Exactly, I love to use linear designs in my quilts. Wait till you see this technique of working with linear designs. It's so easy. To do lines, you can use computers. You can use special gizmos to hook on your machine. You could use rulers, or you could use something that you carry with you all the time, which is this. -
laughs
Baby Lock
Okay. Let's see you do this. That's my preferred method, okay? Okay, I like this idea. I can just push my machine and let gravity do its work... And do a straight line. I can also go up and down. There we go. That's a better one. Easy. - Yes. I think you should try it. Okay, okay. One finger. - One finger, okay. One finger. - One finger does it all. Okay, so I'll-- Excellent. Oh, my, this is-- Isn't it freeing? - It's very freeing. I mean, I have done free-arm quilting-- or, excuse me, free-motion quilting and forgot to breathe. Exactly, exactly. This allows you time to breathe, time to relax, and time to really enjoy your artistry. So this is kind of a traditional look to quilting, but then you have other options. What if some-- what if you at home would like the traditional feather or swirl? Oh, absolutely. It's great. It's as if I'm just drawing on a piece of paper. So if I wanted to do something traditional... I just move it like it's a pencil and start making a feather. Go down the other side. Now, I do something a little bit different when I'm doing feathers. I'm not thinking that I'm making a feather. I'm actually saying, "Ear and an ear and an ear," to myself. Ear, ear, ear. - Yeah. It tricks me. - Oh, sure. Okay. It tricks me into being able to do it. Sure. - And I'm not intimidated by thinking, "I have to make a feather." And then you can add to that feather. Yes. - Or to the ears. Yep, add to my ears. And I've also found that when you add little elements like this, you aren't focusing so much on the individual feather. Oh, sure, you're-- And you're gonna be much more comfortable. Element to element to element. - Yes. So you're gonna have a much bigger picture to look at. And you're gonna be much happier with the results. And if you would check my shoulders, I'm not tense. I can actually breathe.
both laugh
Baby Lock
And I'm having fun with it. No tight shoulders. Well, the fact that you are talking, stitching sidesaddle, kind of like what I do, stitch sidesaddle or sew sidesaddle, shows me that this is easy to do. So the equipment in quilting has changed over the years. The process-- needle, thread-- you still are tactile. Absolutely, absolutely. - You still are using color. But how you put it together really doesn't matter as long as you're enjoying it. Exactly, and that's so much what I believe and what I teach, is, it's not about exactly what it looks like when you're done. It's the process. - The process. Enjoy the process. - Exactly. Well, Kay, you've given me a greater appreciation for longarm quilting. I'm gonna try this finger technique. Yeah. - Yeah. I'm going to do that. I think I'm probably gonna find you over here later today quilting a quilt. Okay, you might. You might. Thanks for being with us. - Oh, my pleasure. Thank you. Special thanks to Kay Capps Cross for the special lesson on longarm quilting. I hope you've enjoyed this first episode of "10-20-30 Minutes to Recycle Jeans." I've shown you four different projects. I hope you'll try one. Next time, we'll be back with four additional projects. You can re-watch this episode as well as many other Sewing With Nancy programs online at NancyZieman.com. Join us on Facebook, and join me on my blog for all things sewing, quilting, and embroidering. Thanks for joining me. Bye for now.
announcer
Nancy has written a fully-illustrated book that can be used to create the projects featuring repurposed jeans included in this two-part series and more. The book is $14.99 plus shipping and handling. To order this book, call 800-336-8373, or visit our website at sewingwithnancy.com/3007. Order item number BK3007, "10-20-30 Minutes to Recycle Jeans." Credit card orders only. To pay by check or money order, call the number on the screen for details. Visit Nancy's website at NancyZieman.com to see additional episodes, Nancy's blog, and more. Sewing With Nancy, TV's longest-airing sewing and quilting program with Nancy Zieman,
has been brought to you by
Baby Lock, Madeira Threads, Koala Studios, Clover, Fuller Brush vacuums, Amazing Designs and Klass Needles. Closed captioning funding provided by Riley Blake Designs. Sewing With Nancy is a coproduction of Nancy Zieman Productions and Wisconsin Public Television.
The latest from Nancy's blog

Search Sewing with Nancy Episodes

Donate to sign up. Activate and sign in to Passport. It's that easy to help PBS Wisconsin serve your community through media that educates, inspires, and entertains.
Make your membership gift today
Only for new users: Activate Passport using your code or email address
Already a member?
Look up my account
Need some help? Go to FAQ or visit PBS Passport Help
Need help accessing PBS Wisconsin anywhere?

Online Access | Platform & Device Access | Cable or Satellite Access | Over-The-Air Access
Visit Access Guide
Need help accessing PBS Wisconsin anywhere?
Visit Our
Live TV Access Guide
Online AccessPlatform & Device Access
Cable or Satellite Access
Over-The-Air Access
Visit Access Guide


Follow Us