


PBS Wisconsin Passport
Watch this video with
PBS Wisconsin Passport
Become a member of PBS Wisconsin, support your local community, and get extended access to PBS shows, films, and specials, like this one.
Newton GenNEXT | Tommy’s Flair for Flares
01/04/18 | 23m 43s | Rating: TV-G
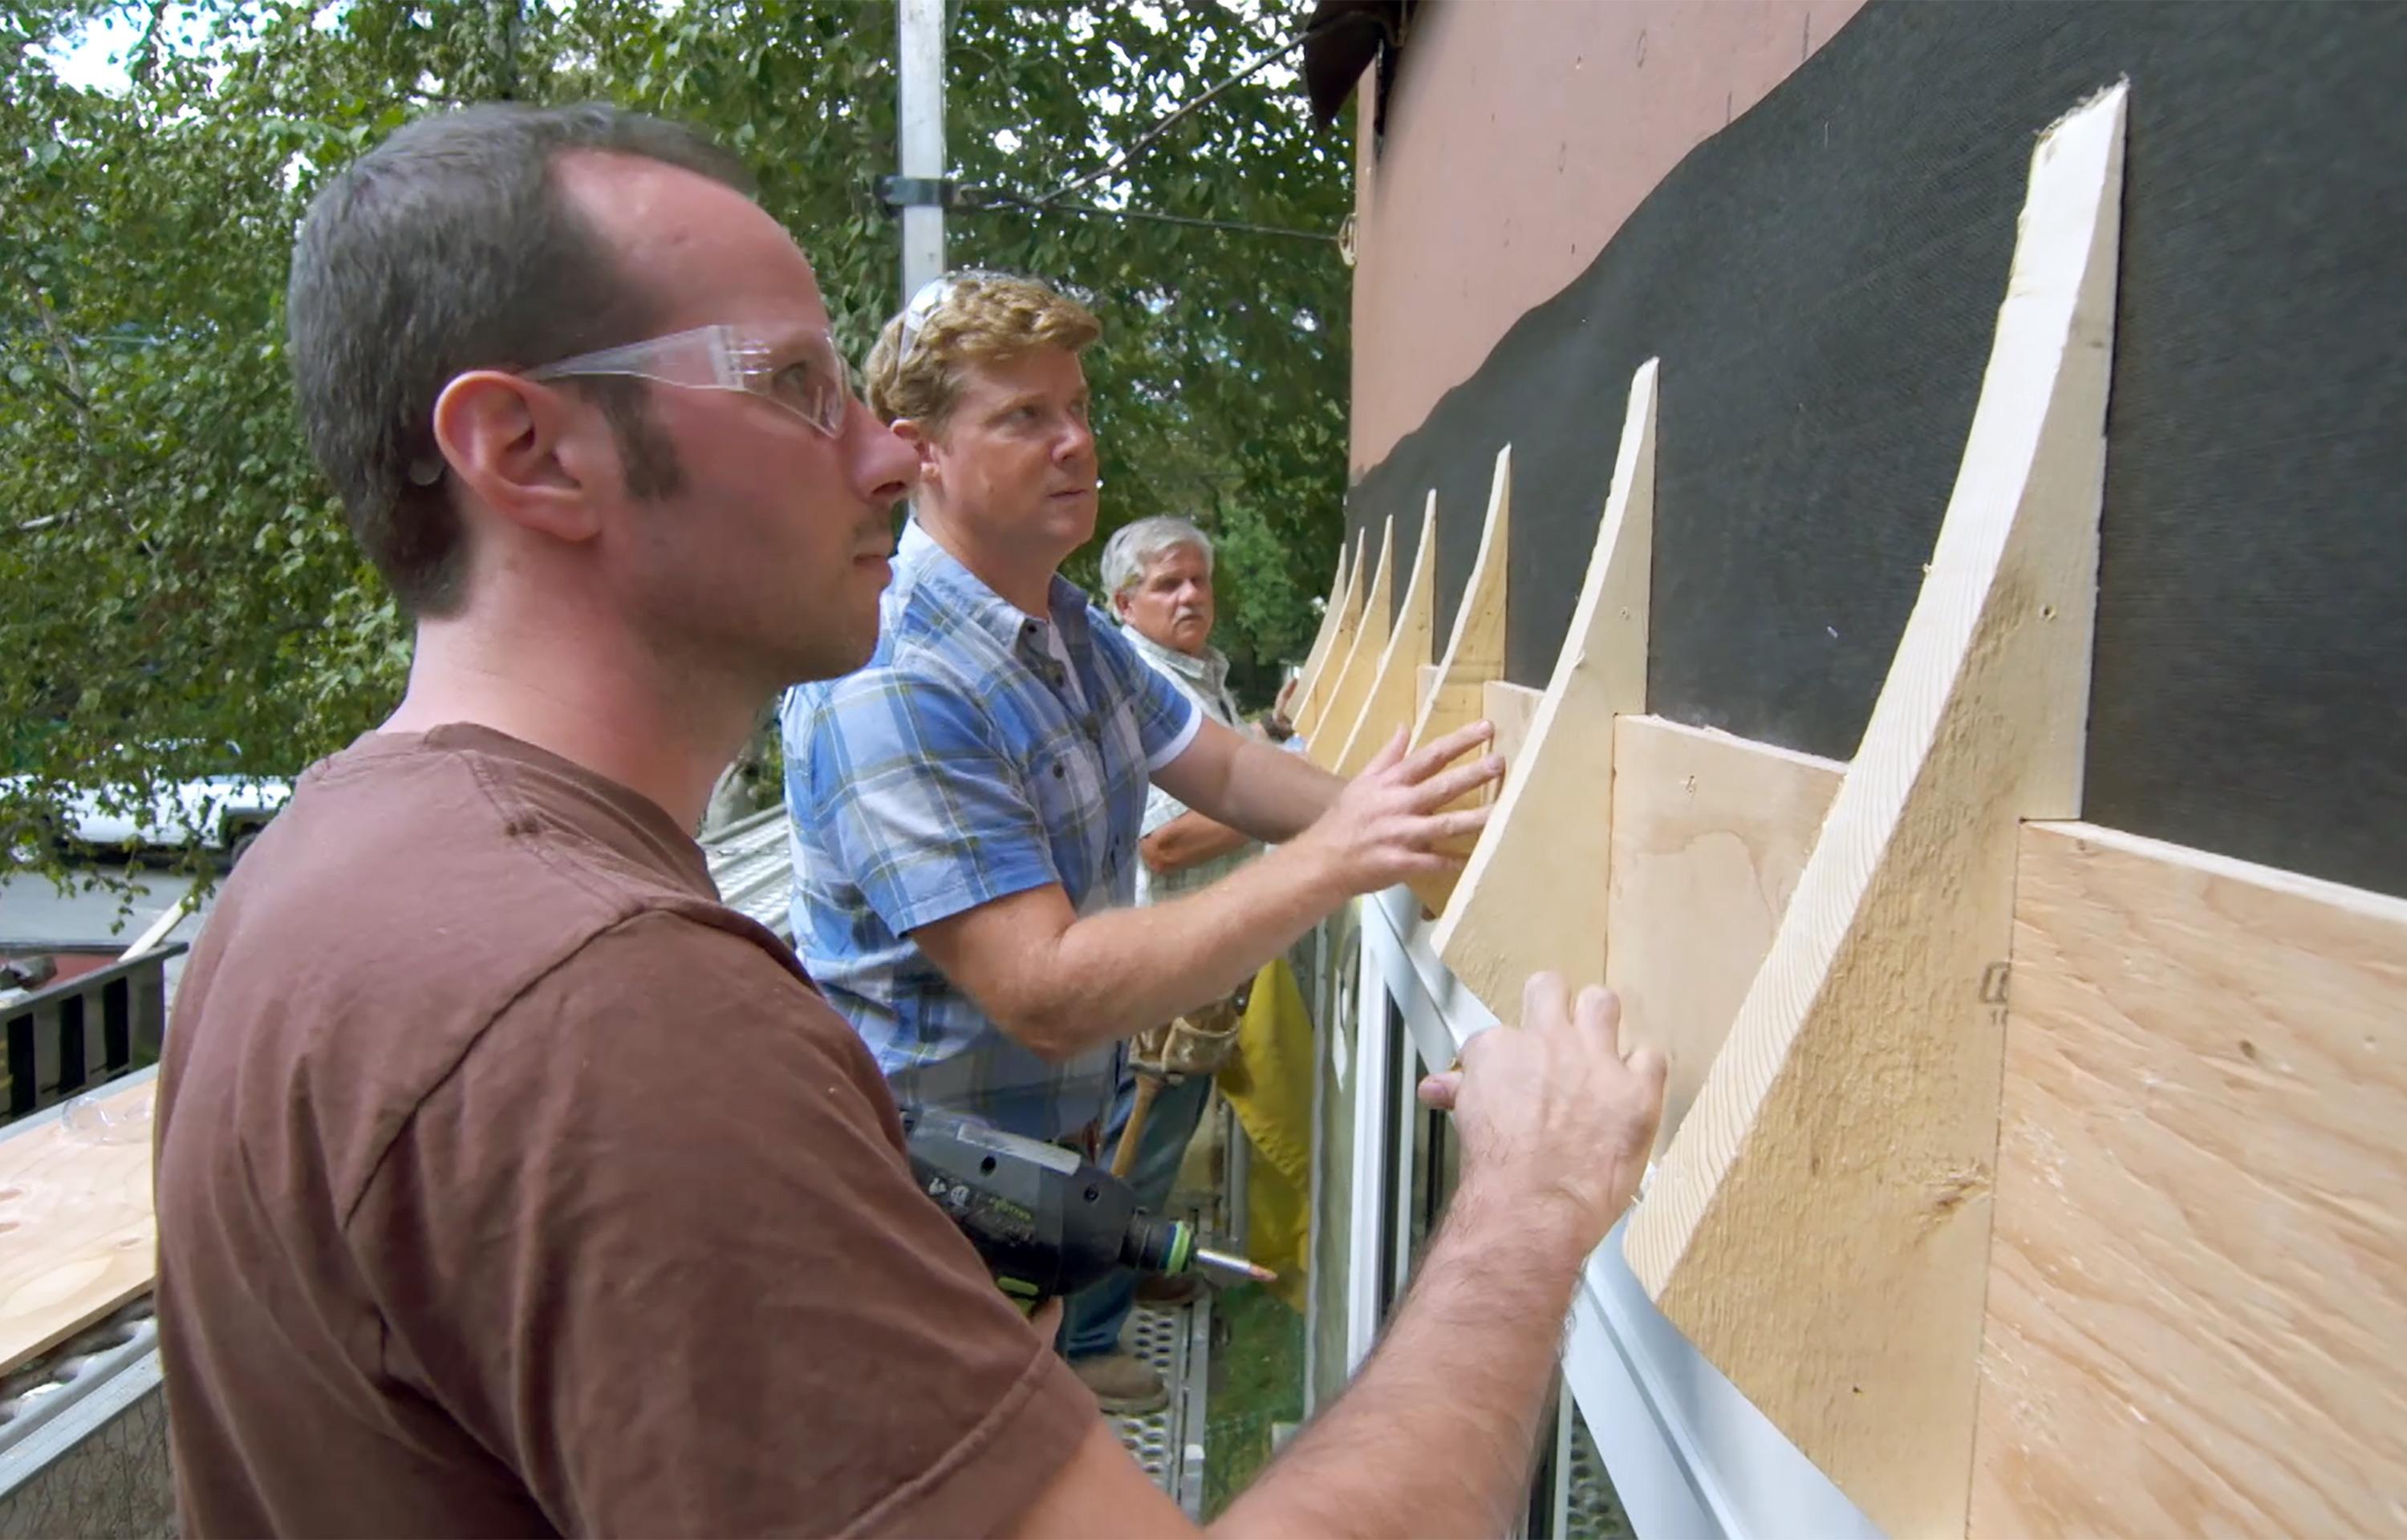
Tommy builds a shower seat made of foam. Richard connects steel piping. Tommy teaches how to install replacement windows. Tommy shows Kevin and Joe how he makes a jig for the exterior shingled flair detail.
Copy and Paste the Following Code to Embed this Video:
Newton GenNEXT | Tommy’s Flair for Flares
Kevin
Today on "This Old House"...
Tom
Our new carpenters learn new-window replacement. Make sure this weather stripping is out on top of the edge of the casing.
Richard
This tool takes the drudge work out of gas piping.
Kevin
What happened to all of this plumbing here?
Richard
I've never seen anything like this before.
Roger
There's already rot going on in that trunk.
Kevin
So what have you found up here?
Tom
Well, a bit of a surprise.
Richard
It's really the classic plumber's lament.
Nice. Tom
Nice. It is right on.
Kevin
A family that paints together stays together. Nice job, guys.
Richard
Where will a slab like this be used?
Tom
The money is in the detail.
Kevin
Oh, that is beautiful. Hi, there. I'm Kevin O'Connor, and welcome back to "This Old House," here in Newton, Massachusetts, where this house that we're working on, it's a bit of a mix between old and new. Our homeowner Liz actually grew up in this home, and this was her bedroom as a little girl. And there's not a lot of changes going on in that room. As you push down the hallway, this bathroom here was renovated just a few years ago, so no changes to that room. And then, as you come to the back of the house, there was a bedroom back here. Part of it is going to be used for a new laundry room, and then this starts the new space. And so right here is where the master suite starts with a big bedroom. As you come in here, there's going to be a big master closet which, then, you step through into a master bath. Tommy, how are you?
Tom
Good, Kevin. How you doing?
Kevin
I'm doing all right. So, it looks like you are preparing for tile.
Tom
Yes. This is a board that we've put on the wall. It actually has a waterproof coating on it. We still have to tape the seams and the screw heads, but it's foam -- the substrate is foam. And what I like about the foam -- it's very light, but it's really very stable.
Kevin
You like something stable behind tile so that we don't have any cracks, so that the grout doesn't open up. And we've used it before, and you've told us that this membrane right here, I mean, that is waterproof.
Tom
That's waterproof. I've actually done it before. You can get this membrane in a roll, so you can put it on, like, your wallpaper.
Kevin
So, once this is taped and these are covered up, this is ready for tile?
Tom
It's waterproof.
Kevin
What have you got left in here?
Tom
All right, so what we're going to do right now, the next thing we're going to do is we're going to build a bench right here.
Kevin
Oh,
sure. Yeah. Tom
All right?
Kevin
So, big shower, so it has a place for them to sit.
Tom
Yeah. Yeah. So, I'm taking a measurement for the bench. I'm going to start cutting the pieces.
Kevin
Wait, are we building this out of the foam?
Tom
All out of foam. Now, you can build it out of wood, but I like the foam, again, like I say, for the stability.
Kevin
Let's do it.
Tom
All right, so we're actually going to support the top of our bench with this 2-inch foam board, all right?
Kevin
Going to be the legs, basically?
Tom
That's going to be the legs. So, I've already cut the back part, so now I'm going to just score the front. Then all I've got to do is snap this.
Chuckles
Tom
No noise. No dust. So, all we have to do with these now, once I have my pitch going the right way, just place them 16 on center like that. And normally, the way you used to do this, is you would mix up thinset -- the same thing that sets the tile. And you would cover the edge, cover the back, and then glue it in place. But now, they make a caulking, so we can just run a bead of caulking.
Kevin
I mean, it was already the easier, and now it's even more straightforward. Although, looking at them, they don't even seem like this is going to be strong enough to sit on and create a bench, where you used to used 2-by stock.
Tom
2-bys, a plywood top -- you know, all that. So, everything's eliminated.
Kevin
But 2 inches of this foam -- super rigid, strong enough.
Tom
And with this 2-inch foam, 16 on center, it's really strong. Across the back. On the side. Bring it in.
Beautiful. Tom
That's it.
Kevin
Are we ready for the top?
Tom
We're ready for the top. Okay.
Top coming in for you. Tom
All right. So, let me just get some more on this. I'm going to do the top of all of these legs. All right, so now I'm just going to put a piece right on the front, and the front is actually the thinner material. It's the same thing that we used on the wall.
Kevin
What do you think, Tommy? I mean, can you sit on that thing right now?
Absolutely. Kevin
Sturdy enough?
Tom
Yeah. Maybe for me, but I don't know about you.
Kevin
That's crazy.
Chuckles
Tom
Yeah, very strong.
Kevin
So, we've got some seams.
Tom
Yeah, and we treat -- First of all, you're going to treat the seams, because this is already waterproof. We have to treat the seams, so we're going to set these in thinset with a notched trowel. You have an outside corner.
Kevin
Already cut and folded for us.
Tom
Yeah. An inside corner.
Kevin
Already cut and folded for us.
Tom
Yep. You just slide those in. Again,
you set that in thinset. Kevin
Yes.
Tom
Okay, we're going to do one more thing. We're going to heat the seat.
Chuckles
Tom
So, this is a board that we will put down with thinset. All right, you place it in, and then you run an electric wire.
Kevin
Give you a reel right here.
Tom
Okay, so here's a piece. And you want to stay like 3 inches away from the wall. And you just bring it in, and you go up and down, 3 inches away from the back wall.
Yes. Tom
And you go 3 inches apart. And you make a loop, or I could go back and forth like this.
Kevin
And then this is going to get tied into its own thermostat for the space?
Tom
Right, and it will set the tile nice and warm.
Kevin
And so, for the floor, back to the foam?
Tom
You just lay it on the floor.
Kevin
So you guys have measured and cut this to size?
Tom
Yeah, everything's cut.
Kevin
And...the other half of this. I mean, already tapered is great, right, because the old-fashioned way used to be a mud job where the guy had to come in, and he'd --
Tom
Well, you had to put a pan in there.
Kevin
Right.
Tom
So, once you've glued all this down, again, with the thinset, you set this with the PVC cement, a lot of thinset around here, you force it right into place, and your drain is waterproof.
Kevin
And so, I know it's a small thing, but the drain cover being square saves the tile guy so much work, where he doesn't have to clip a little circle.
Tom
It's a huge thing. I mean, just cutting straight is always easier.
Kevin
Now, will the floor get heat, as well?
Tom
Yeah. We'll waterproof everything, tape all the joints, and put that same system down right here with a wire, and you'll have a heated floor.
Kevin
It's going to be a very sweet bathroom, Tommy.
It sure is. Kevin
All right.
Richard
So, much of the water piping has been run in the building. But today's project is to run gas lines from the gas meter, across the basement ceiling right here, to our new boiler location. Now, this boiler is going to heat water for faucets, but also the building itself. And gas connections are important. You have a little leak on a water line, it's no big deal. But with gas, it's unsafe. But the way we connect gas is changing. Zack and Alex are our plumbing apprentices helping on this project, and they're going to help demonstrate how we've always cut steel pipe. This is a power drive. This is what I grew up on. Sitting over this, the pipe will turn, and you'll cut thread and ream it. So, Zack, why don't you get started? So, first, he's going to take this cutter right here, and there's a cutter blade right here. He's going to get it tightened up and then turn the drive on.
Machine whirring
Richard
A little bit of tightening at a time.
Whirring continues
Richard
All right. So, you can see that it's cut. But you see there's a still a raw edge right here, and that's going to add friction, so we've got to make sure that we deburr it with a reaming tool like this.
Machine whirring
Richard
Okay. So, you can see how nice it is on the inside. But we're not done yet. We still have to cut threads into this, and these are tapered threads, where they gradually get shallower. And that's done with this die right here. So let's get that set up. All right. Slide that in. And Alex can put some oil on it. Ready to go? Here we go.
Machine whirring
Whirring continues
Richard
There we go. Great. Okay? So, that gets plenty hot. That oil is really important to protect the die and keep the work from overheating. All right. You're going to back it off now.
Machine whirs
Richard
There you go. Good. So we've cut it, we've reamed it, and we've threaded it. But we're not done yet. We still have to wipe down the thread to get rid of the excess oil. Just grab me that fitting, would you? It still needs pipe dope to be applied on the threads, and then we have to add a fitting. And the fitting has the opposing threads that are tapered just like the pipe itself. We turn that on clockwise. And then we have to tighten that up with two wrenches -- one wrench on the fitting, and another on the pipe. And you tighten that fitting up enough until you get the angle just right. But each one of these connections could be, what, 5 or 10 minutes. Well, there's a new method, a faster method, that doesn't require all that. Our piping is still the same steel piping we've always used, but the connection's a lot different. For that, we have a fitting. That fitting is made out of steel, but there's a gasket inside. See that yellow in there? That's a special anti-corrosion gasket that's going to not have any effect from the steel pipe or the corrosive nature of gas. Now, a tool will clamp that steel down, really sealing that gasket in. Alex, why don't you give it a start by cutting it?
Saw whirring
Whirring continues
Richard
Good. All right. Because it was cut square, there's no need to ream in there, but we do have to just clean it a little bit with some emery cloth, just to make sure there's no imperfections that would go against the gasket. You don't have to do much. Okay. So, now you want to be sure that this fitting goes on enough to be sure that the gasket seals in the proper place, that there's enough meat inside. So an important safety step is to mark the pipe with a special marker. That tells you that you're on far enough. All right. Zack, why don't you come in with that tool, please? So, this is the tool here. It has special jaws for each size of fitting. It's battery-operated, and it puts just the right amount of torque to compress this fitting. You put it right over the shoulder. You make sure the fitting's all the way onto the mark.
Tool whirring
Richard
And that's it. That's not going anywhere. And it's a safe connection. It took us about a minute, and that really adds up when you have a lot of gas connections. It saves a lot of time.
Kevin
Another day on the jobsite means another lesson with the apprentices. And, Tommy, today, apparently it is windows.
Tom
Yes, we're installing new windows, replacement windows, into the existing opening, and we're going to start in this room right here.
Kevin
All right. You guys are in good hands.
Tom
Okay. So, now we're going to replace the double-hung windows that are in the house. And what I mean by double-hung -- That means that the top and the bottom sash hang on a rope-and-a-pulley system, and they operate independently. We're going to replace them with the same type of a system, only we're not going to use the ropes and pulleys. Now, first of all, the type of window that we have here is primed on the inside. It has an aluminum clad on the outside with a color that the homeowner chose, so they'll never have to paint the outside. So no maintenance. The good thing here is, also, that it's now insulated glass, which will be much more efficient than the old windows. Now, when you're installing replacement windows into an existing opening, there are a couple of different windows that you can get. You can actually get what is called a boxed unit, where the window comes with a jamb, the header, the two sides, and across the bottom. And you take that box, and you slide it into the opening, and you shim it as needed. Then you put your trim back on. These units are different. We're actually going to install a sponge balancing system on each side and snap the windows into it. All right? So, the first thing -- we have to install these right here. These are sponge balancing systems. Now, these blue clips are where the bottom of the window sits, and they're attached to this string right here. And there is a spring up there that holds the weight of the windows. So, no matter where you position it, it will stay where you want it to stay. On the backside of this is actually a sponge, and that sponge sits up against the jamb like that. And that sponge will stop any air from moving in between here, keeping the window nice and efficient. Okay, so the next thing we need to do is install our clips to hold our sponge balancers. And they are actually nailed to the jamb. Once they're in place, we'll snap this against them or into them, and that will hold it. There's a little groove right there that it goes in. And right here, they pop in, and that holds the whole thing to the jamb. Now, the height of this window, we're actually going to install five clips on each side. So what I want to do is I want to push it tight to the back of the casing, move it in just a little bit. I'm going to pre-drill just a starter hole. All right. Now right in there.
Got it. Tom
Yeah. Good. All right. So, now we'll just make it straight, and I'm going to put one more nail on the slot, in the center of the slot, because we want to be able to adjust it in and out just a little bit. And when you drive the nail, you don't want to drive it really tight. So just bottom it out. Good. All right. Now we're ready to install the vinyl liner. Let's do that one over there first. Okay, now we're going to put it in there, but make sure this weather stripping is out on top of the edge of the casing. So, pull this out. Slide it in. Hold this out. Push it right in.
Nathan
Snapped in the back?
Tom
Yeah. How's it look? Let's see if you can get it in there. There you go. Good. Yep,
nice. Austin
Yes.
Tom
All right. Let's get the top sash now. Put it in the slot. Keep it up high. Now put yours in the slot. All right, now keep the window leveled. Drop it down. Okay. Put a little bit of pressure on it, not much. Stand it up, and slide it right into the spring balancers. There you go. Good. All right, now push the window up. Good. Oh, no, you got to make sure that it's locked in. See? All right, now bring it back down. Let it sit. There.
Window clicks
Tom
Did you hear it click?
Yep. Tom
There they go. All right, now they're on. There. See? Now it holds it into place.
Nathan
Nice.
Tom
All right, now the bottom sash. It's the same process -- put the window in, keep the window level this way, put it in your track, keep it up a little bit high until you're both in, and then bring him down level. Put a little weight on it to make sure it's seeded in there, and then slowly push it up. Push the window down. Makes sure it's caught. There it goes. Now push it up. Yep, that's good. Okay. And bring it down.
Nathan
But one of them's loose.
Tom
Bring it right down. It should catch. All the way down. All right. Now we'll lock it. Let's go outside and see how it looks. All right, guys, there you go. Your first window. What do you think?
Nathan
That's one sharp-looking window.
Tom
Yeah, it is.
Austin
I'd say we taught you pretty well.
Laughter
Tom
You sure did.
Bailey
I like how the aluminum keeps it smooth.
Tom
The aluminum's smooth, and they'll never have to paint it. And they're going to save a lot of money on their energy bill. Well, we only have 33 more to go.
Austin
Aw,
man. Tom
Let's get going.
All right. Tom
The sun's not down yet.
Austin
It's time to go home.
Tom
Not yet. Not yet.
Kevin
The exterior of our house is clapboards on the first floor, and it's going to be shingles on the second floor. And our architect, Matt Cummings, has called for a flare detail to separate those two. Now, that's going to help to break up the mass of the house. It's also a detail that you'll see throughout here in the neighborhood. And it's a big job, a lot of work. So, Joe, you're going to throw in with us?
Joe
Yeah,
I am. Kevin
Awesome. And, Tommy, you've done flares before.
Tom
Oh, yeah, all kinds of flares.
Kevin
Well, it's a little different
than what we've done recently. Tom
This is a little different. I mean, most people think of a flare that starts at the bottom of the house, and the shingles come out a little bit and they roll up. It's pretty simple to do. I've got some scrap pieces here to show you. So, if we take a filler -- And it depends on how much we want to get the single out. But let's say I take a filler like this, and I cut a little wedge on it.
Yeah. Tom
Secondary one right here. So, if I wanted to bring this bottom row out even prouder, I could put a filler under like that or just make this wider.
Kevin
And then we're going to press the shingles
into it like this. Tom
Right. So, you take your starter course, and that always wants to hang down lower. And then your first course -- Again, the joints don't want to line up. You'd push down, and you'd have this filler right here set, so where your nailing is, you want to nail through that. Then your next course would go on here, push down -- and, again, that would be depending on your reveal. And we've built our flare much simpler. Now, you could do that where we want to do it -- at the top of this. But Matt wants to celebrate that by putting a crown-molding detail right there.
Kevin
Interesting. So, just below where these shingles end...
Right. Kevin
...and before the claps.
This is the transition. Tom
Right. And that flare will really roll up the wall nicely. So we're going to do that a little bit different. We have actually made a jig -- or, basically, we've made the curved studs -- 16 on center. We've mounted them on a piece of plywood like that.
Kevin
Okay.
Tom
So, now when we take our crown detail with our small fascia board and put it right on there like that, we'll then take a piece of plywood and bend the plywood on here. We don't want the plywood to go beyond this. Then we'll take our shingles, put them on top of the plywood, and build it up again, forcing them down, just like we did at the bottom.
Kevin
Whew! A lot of stuff going into that.
Tom
A lot of stuff, a lot of work, and it's time-consuming. So, we're cutting all of our curved studs right here. We've made up a template. This is a piece that we've cut the back out to where we're going to mount it to the plywood. All right? So, now we take our template, and we hold it flush on the top, even on the back, where the plywood's going to go, and also even on the bottom edge that's going to go against the house. So, now, holding it tight, mark it.
Got it. Tom
Okay. Good. Okay, so now we've got a notch on this side, so we can flip it over. Again, we want to make it flush on the back in both areas, even on the top. And mark that. Good. What I want you to do now is you're going to cut it with a jigsaw. You're going to stay away from the line about a 1/4 of an inch, because we only want to rough-cut it with the jigsaw, and we're going to fine-tune it later.
Okay. Tom
All right? When you cut with a jigsaw, you want to make sure that you hold the plate flat on the table, so you need to put some down pressure on it.
Joe
Okay.
Tom
Kevin, what you're going to do is you're going to fine-tune these with a router. We have our piece that's the right size, the right dimension, and we're going to use that as a template and guide. So we take our piece that's rough-cut, put it on top -- tight to the back here, even on the top, and flush on the back. We'll put a couple of screws in that to hold it so that it won't move. Okay. So, now, to follow that templating, we have a bearing on the bottom of our straight cutting bit that will cut flush with that bearing. And you're just going to take it and make the cut, nice and slow, holding the router firm. And make a nice, slow cut all the way through, all the way around, and you're done. Okay?
Saws whirring
Tom
Okay, so now we have a piece of 3/4-inch plywood that we're going to mount all of our curved studs to, and they're marked 16 on center to accept it. We also want to put a little bit of glue in behind it and then screw from the other side.
Screwdriver whirring
Tom
Okay. Let's get these up on the wall.
Screwdrivers whirring
Tom
All right. Now let's screw the plywood on. I want to keep it up about 1/8 of an inch off the bottom.
Joe
I'm good here.
Tom
Okay. So now we'll screw this on.
Screwdriver whirs
Tom
And the screws will pull the plywood right in and follow that contour. We fill in down there and then all the way around the house, and we can start to shingle.
Kevin
And then crown molding right there. What do you think about that look?
Joe
That's going to be great.
Kevin
Yeah, that is going to be really good. All right.
Richard
Hey, boys. Who's making all the noise out here?
Kevin
Hey, Richard. How are you?
Richard
Doing good.
Kevin
We're just finishing up this detail right here and starting to think about next week. What do you got coming up?
Richard
Next week, we will actually be finishing
the rough plumbing. Kevin
Good. Tommy, what about you?
Tom
I got a small project inside for Joe to work on.
Kevin
And I'm going to head down to the Idea House in Rhode Island to see
a whole-new type of window trim. Tom
Nice.
Kevin
So we've got all that coming up next time. Until then, I'm Kevin O'Connor...
I'm Joey Delfino. Richard
I'm Richard Trethewey.
And I'm Tom Silva. Kevin
For "This Old House."
Richard
You need me to get anything? Can I help?
Indistinct chatter
Richard
Kevin
Next time on "This Old House"...
Tom
We build a hearth for the wood stove.
Kevin
Mauro's got a quick fix for the holes in our plaster.
Mauro
We're going to use like two or three very thin coats.
Richard
And we visit the realm of the mechanical maestro. Abe Bilo is staring at the blank wall which will house the distribution equipment for this whole building. So, Abe, how do you get started on laying these systems down?
Abe
It all starts with a nice new wall.
Kevin
That's next time on "This Old House."
Search Episodes

Donate to sign up. Activate and sign in to Passport. It's that easy to help PBS Wisconsin serve your community through media that educates, inspires, and entertains.
Make your membership gift today
Only for new users: Activate Passport using your code or email address
Already a member?
Look up my account
Need some help? Go to FAQ or visit PBS Passport Help
Need help accessing PBS Wisconsin anywhere?

Online Access | Platform & Device Access | Cable or Satellite Access | Over-The-Air Access
Visit Access Guide
Need help accessing PBS Wisconsin anywhere?
Visit Our
Live TV Access Guide
Online AccessPlatform & Device Access
Cable or Satellite Access
Over-The-Air Access
Visit Access Guide


Follow Us