 Passport


Let’s Grow Stuff: Designing your turf-free landscape
Today we’re exploring the next big challenge (design!!) in our quest to reshape our landscapes into vibrant, diverse and ecological spaces by replacing our lawns with something better.
Today we’re exploring the next big challenge (design!!) in our quest to reshape our landscapes into vibrant, diverse and ecological spaces by replacing our lawns with something better.
Today we’re exploring the next big challenge (design!!) in our quest to reshape our landscapes into vibrant, diverse and ecological spaces by replacing our lawns with something better. This is an ongoing series and we’re producing a ton of content this year to help empower you to make this transition in your own landscape.
Note: This is Part Two of a 3-part blog series explaining how to “Replace your lawn with something better, a beginner’s guide.”.
First, let’s get caught up. Check out this blog post to learn the many ways you can go about replacing your lawn, and check out this episode to see how we prepare a site and get plants in the ground. Think of today’s blog post as a companion to this episode as we dive deeper and share some resources and techniques you’ll need when you reach planting time.
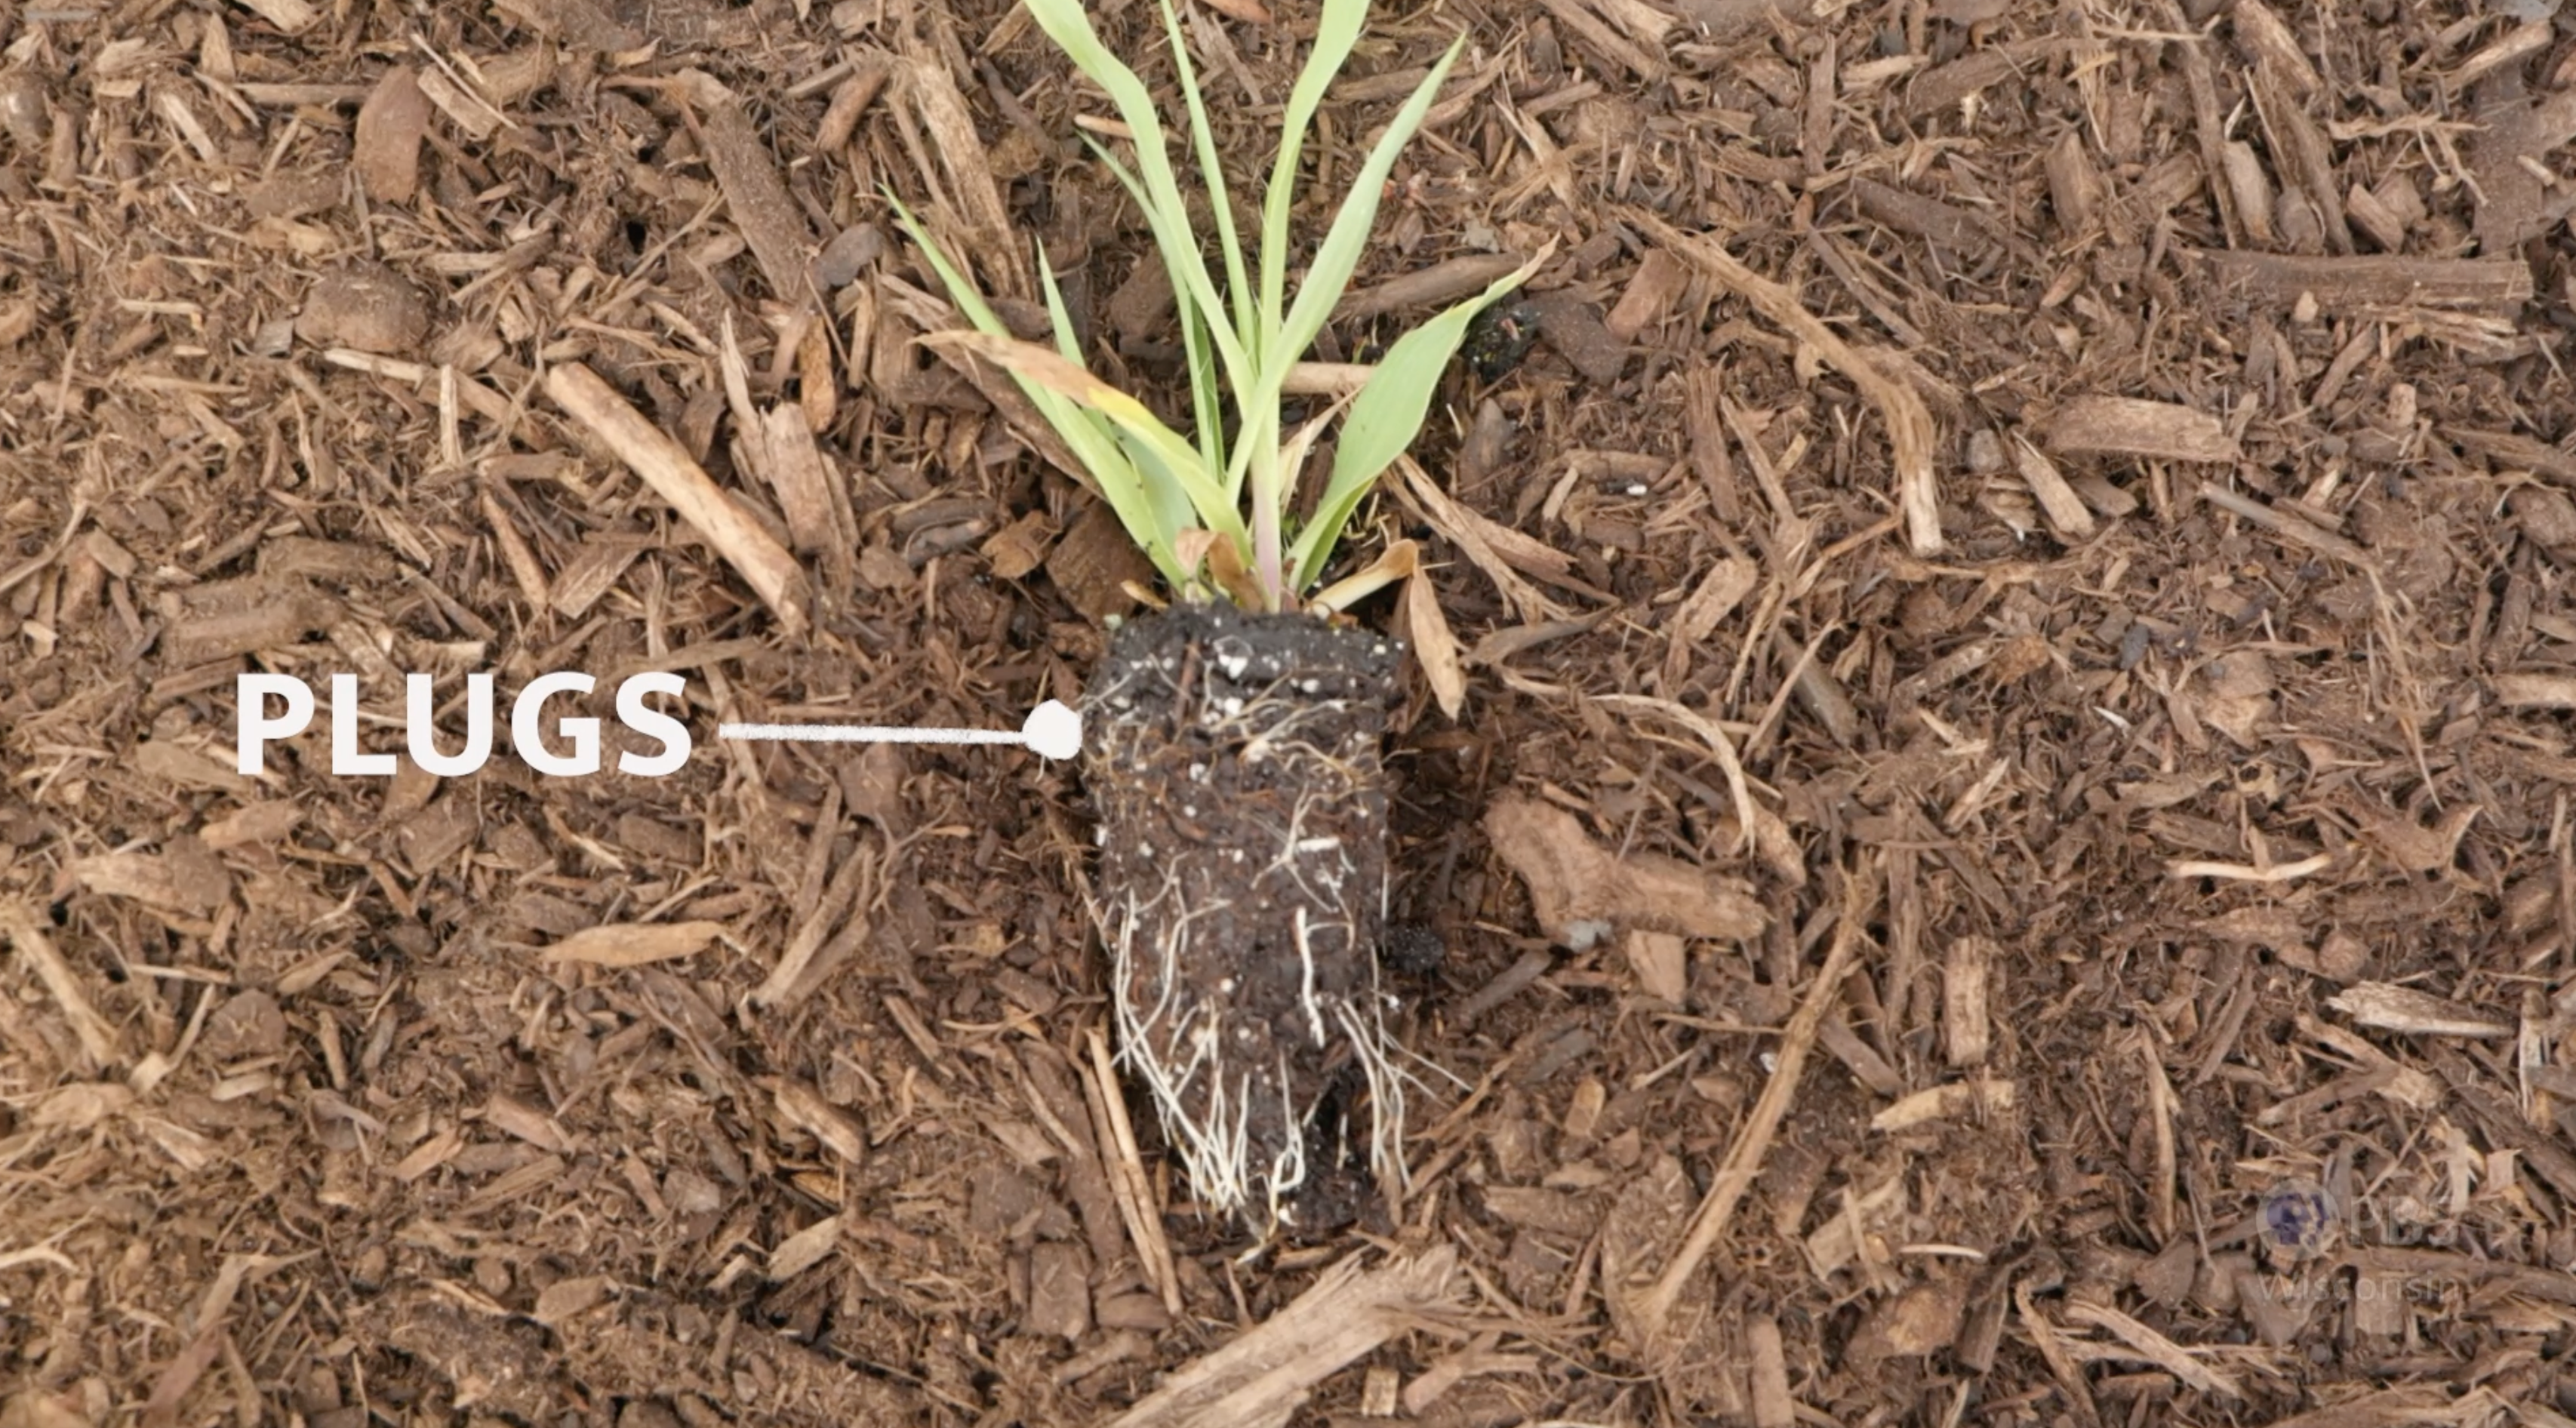
We’ll begin by talking a bit more about the power of plant plugs.
These awesome starter plants may look delicate and tiny, but it’s important to remember they are packed with potential energy, ready and waiting to take off and grow as soon as they’re in the ground. You won’t have to wait long to see them transform. It’s easy for all of us to succumb to the allure of instant gratification — gravitating to larger, more established transplants from garden centers and makeover videos. We’ve been conditioned as consumers to think this is our only option, which simply isn’t the case!
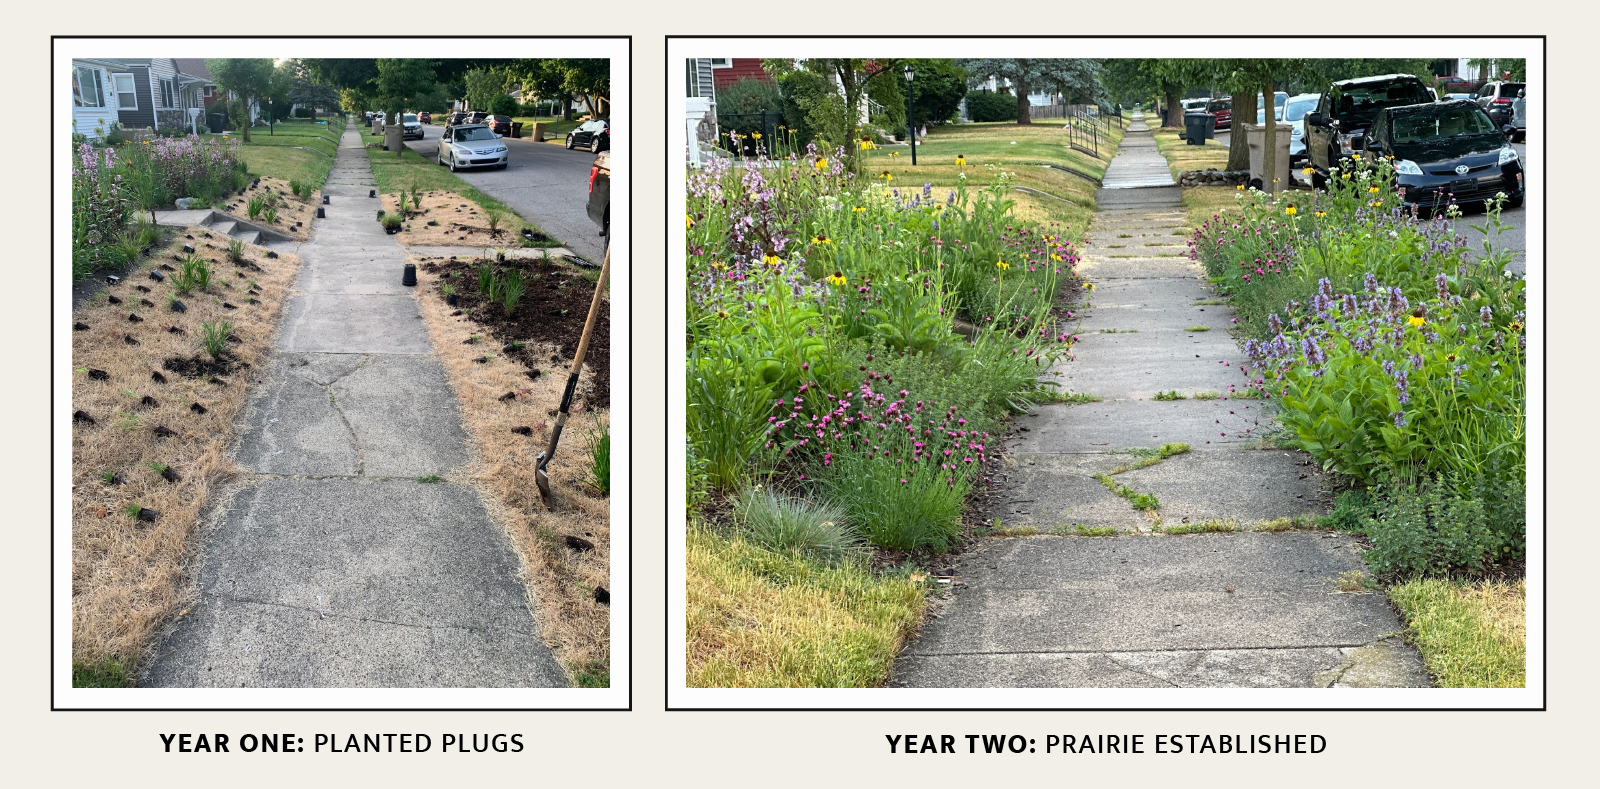
The images below represent exactly one year’s worth of growth in my own garden — a planting made almost entirely of plugs. The first image was taken right at planting time, June 12, 2022. The second image is from June 11, 2023. The change and growth are staggering, and demonstrate how you can quickly grow a lush garden from plugs!
Not all plugs are created equal. The best plugs for these projects are what we call LP, which stands for landscape plug. These are typically deeper than other plugs and this matters because the deeper the roots, the less likely your new plantings will dry out and die while they get established. LP plants usually come in flats of 32, 38, or 50.

Next, let’s talk about money because plants are an investment! Plugs are typically a fraction of the cost of larger quart or gallon size plants, and you can expect to pay between $3.50-$5 per plug depending on the nursery you’re buying from and the species you’re ordering. When we’re talking about replanting an entire lawn — even a small urban front lawn — plant costs can add up fast. You’ll find it’s far more affordable to go for plugs.
Plus, I think there’s something to be said for watching plants grow and mature. It offers you a chance to get to know them in a way you normally don’t when you start with larger plants.
I make two exceptions to using plugs, when I’ll opt for something else:
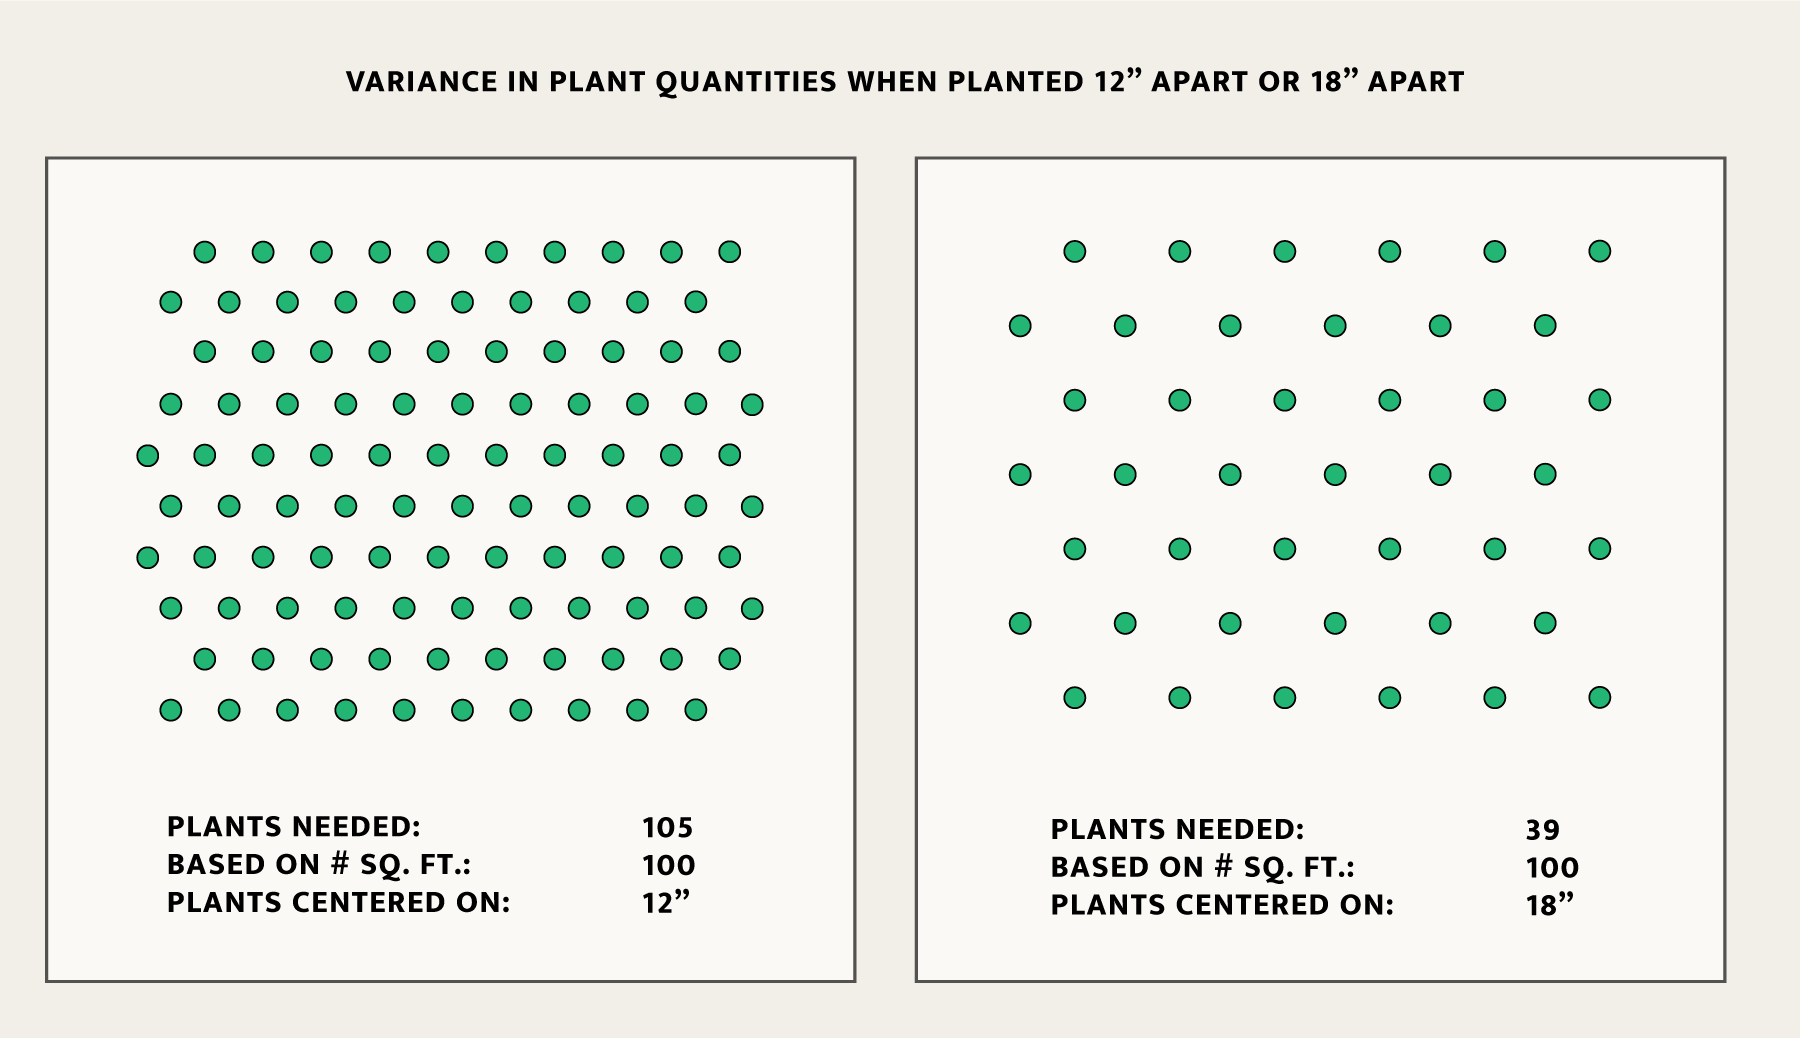
We like to space plants 12-18” apart. Most of the plants shown will grow happily together, creating a dense meadow. The goal is to not see any soil or mulch by June 1st after the third year of the planting. If there are visual gaps between plants by year three, add more plants.
We call this dense method of planting, “green mulch,” and it helps to reduce long-term weed pressure, watering needs, and generally creates a more welcoming and stable habitat for wildlife. Effectively, the plants are creating their own mulch by shading the soil, just as they do in their natural habitats. We keep all material standing and on-site through winter for habitat and groundcover, then mow and mulch everything the following spring, leaving it in place. This “duff” material will become next year’s mulch and be recycled right into the soil. Just one more way your new landscape will help you work smarter not harder!
To know how many plants you need to achieve a successful green mulch status, start by calculating how many square feet you plan to plant (length x width). I like to use this plant spacing calculator from Midwest Groundcovers whenever I’m tackling a new project. You can enter your project dimensions and intended spacing and it will tell you how many plants you need.
Let’s pretend we’re designing a 10×10 space. Below are two scenarios, one with plants spaced 12” apart, the other with plants at 18”. You’ll see quite a difference in the number of plants you’ll need, and this can help you match your budget to the amount of space you’re able to plant. Remember, it’s okay to convert your lawn in phases – don’t feel like you need to do it all at once. Do what you can as you’re able.
Most garden centers don’t have plugs readily available for purchase (I wish they did!) and there are a number of great regional native plant nurseries where you can mix and match smaller quantities or even purchase a pre-made kit of plugs based on your unique growing conditions and the size of space you want to fill.
Also, side note, the more you start asking your local garden center to carry plugs, the more likely they will. Most garden centers have access to them, you just need to ask.
Some of my favorite regional mail-order nurseries include:
Prairie Nursery in Westfield, WI
Prairie Moon Nursery in Winona, MN
Blazing Star Gardens in Owatonna, MN
Check each nursery’s information to see when they ship their plugs, because most only ship in spring or fall when it’s the ideal season to plant. This is helpful when you’re considering your timeline of tasks, especially site prep. Nothing is more stressful (to me, at least) than when plants show up and I don’t have a space ready for them yet!
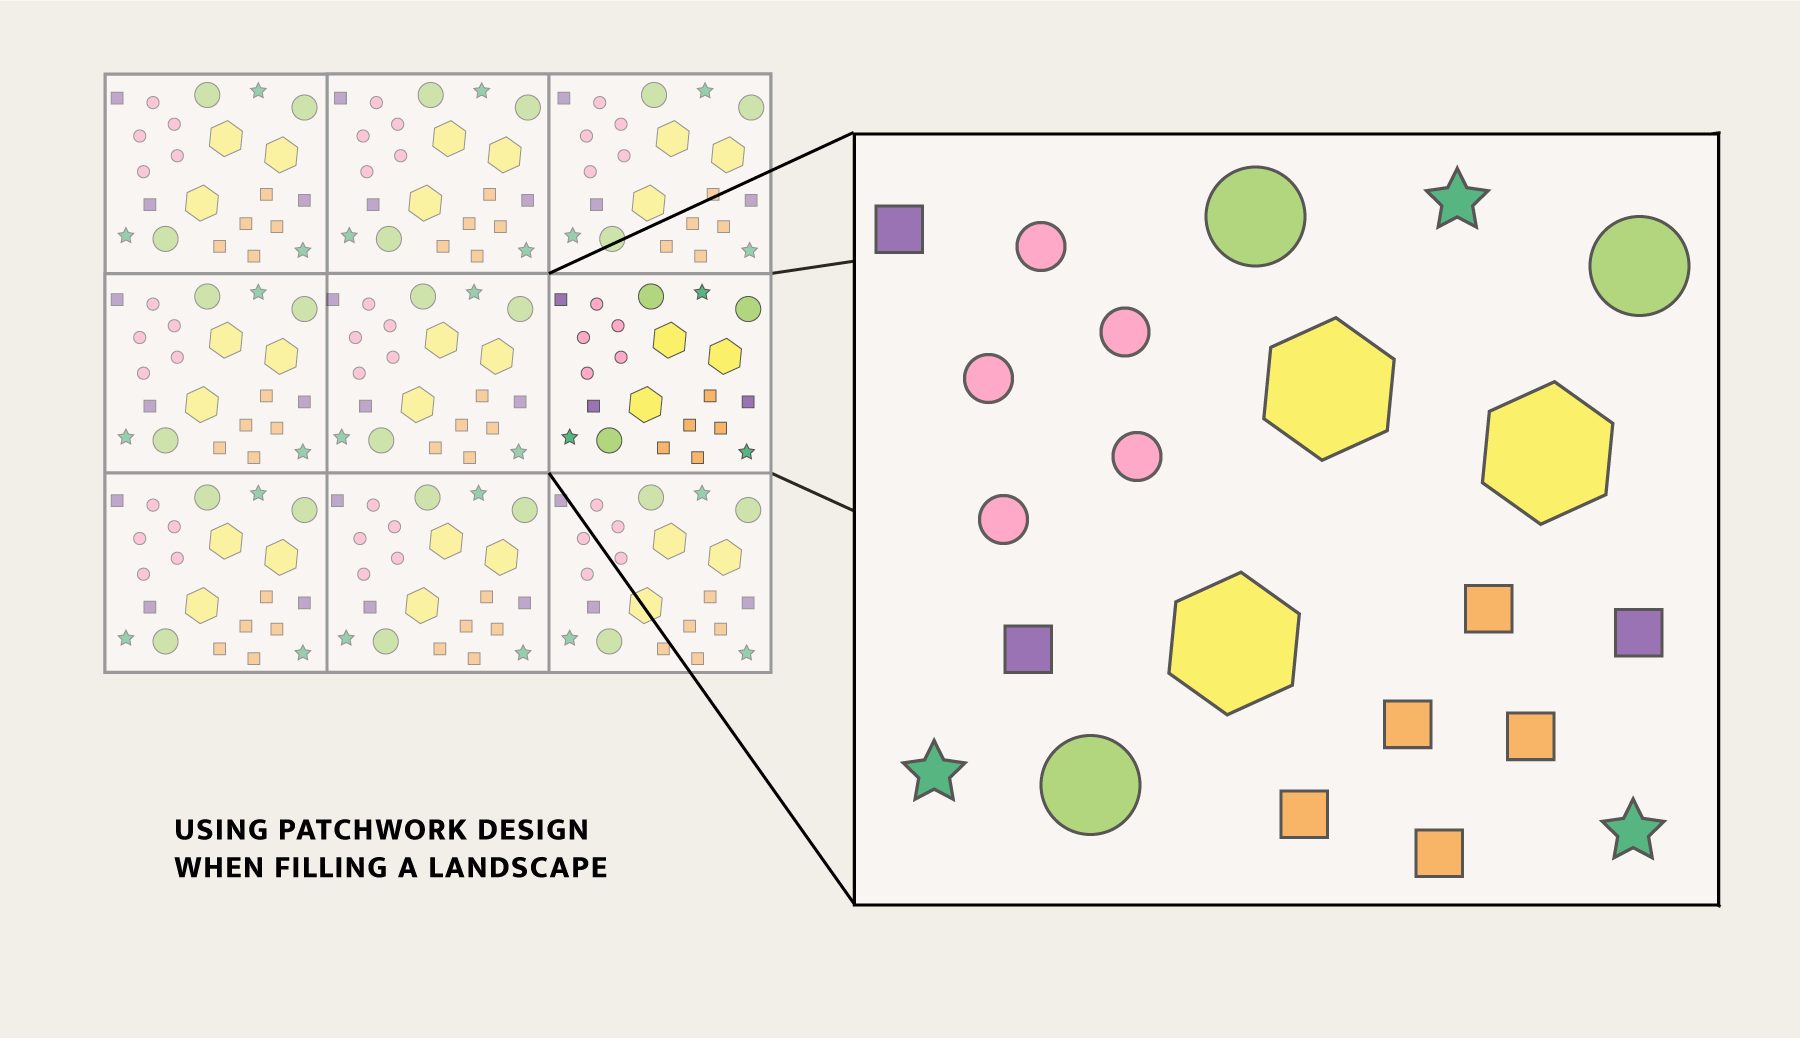
As mentioned in the video, think of designing your meadow like quilting. I find it helpful to start by creating a pattern “square,” let’s say a group of 3-5 plants, that you’ll then repeat again and again over your entire “canvas” (i.e. former lawn). This repetition helps to make the entire planting feel connected and cohesive and intentional while avoiding the negative perception of neglect.
Depending on the size of your planting area, you can create as many of these pattern squares as you need. I think at least 2-3 pattern squares help to make the most dynamic plantings, and this is just a starting point – you can always create more!
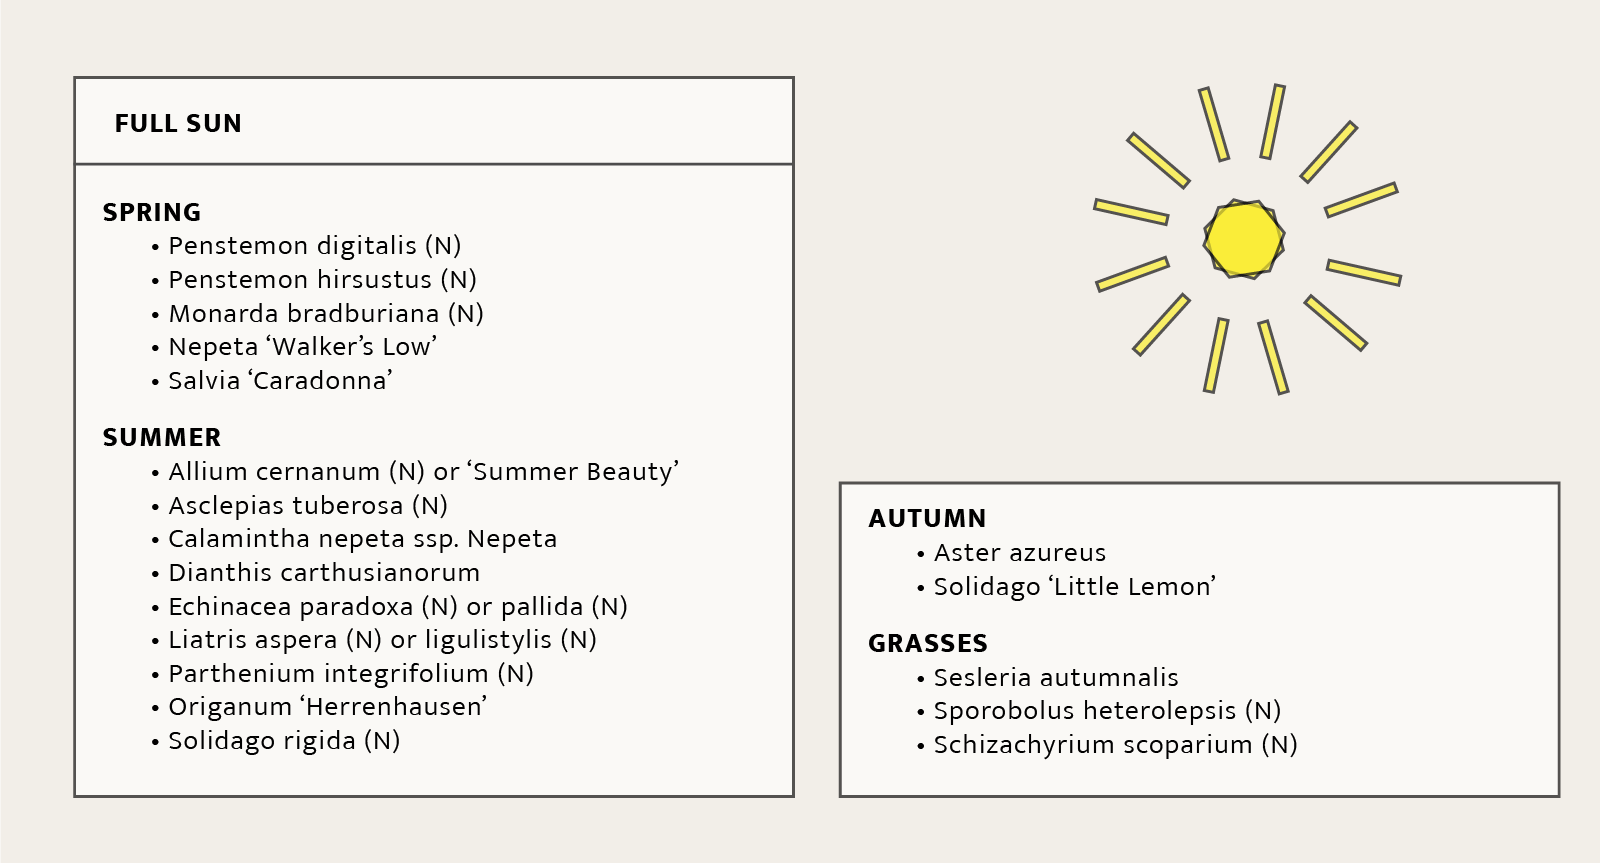
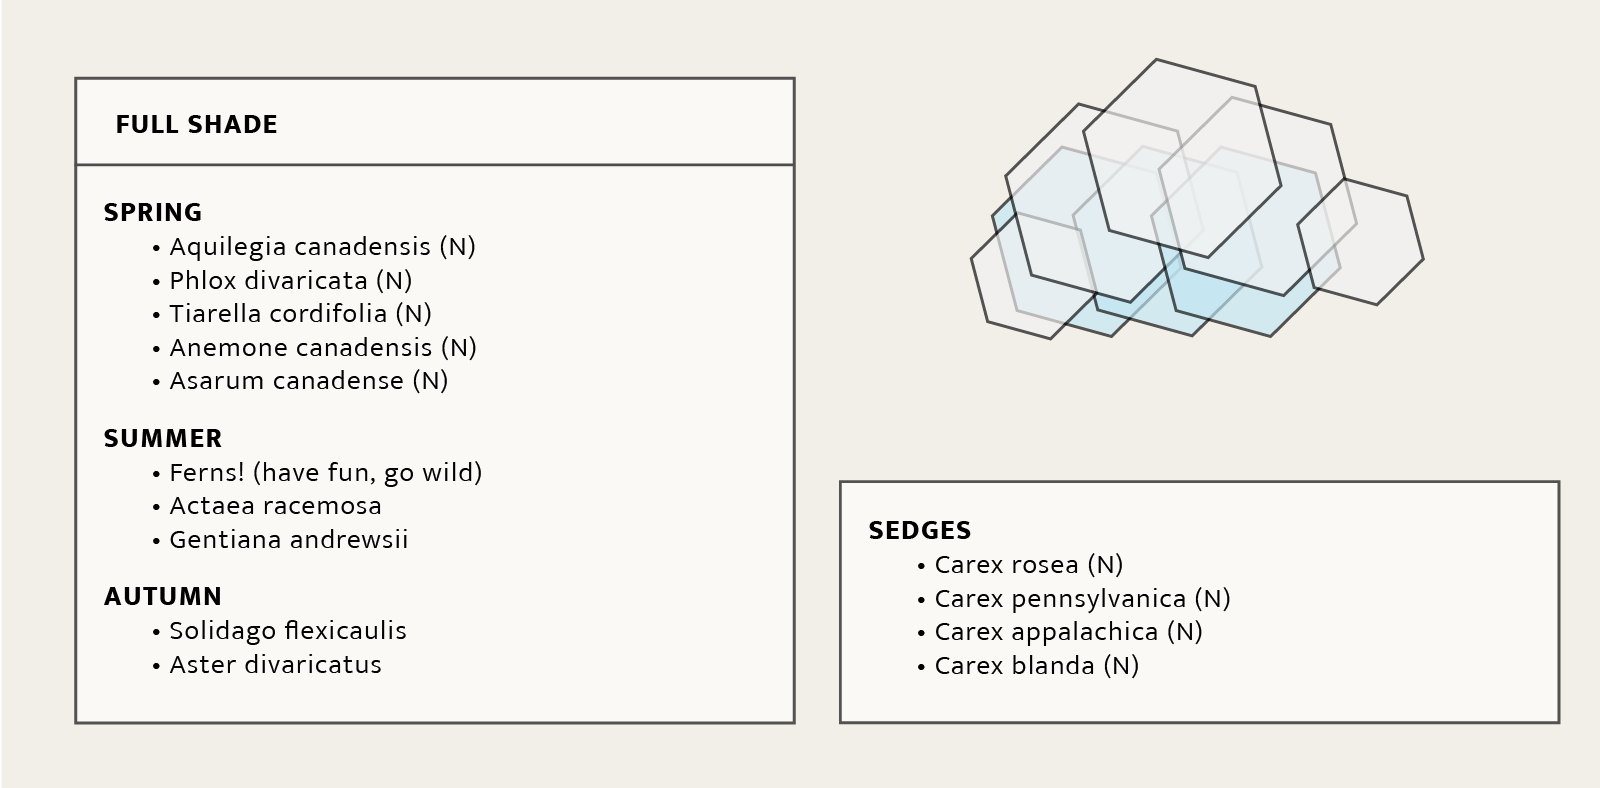
When designing a meadow to replace a front lawn, I have a few “go to” favorite plants that tend to work well for these conditions. These plants tend to “play well together” as I like to say, in the sense they won’t take off and get out of hand if you turn your back for fifteen minutes. Below are two lists, one for sun and the second for shade. You can mix and match these plants to create your own patterns! If you’re growing in a part shade area, you can mix and match plants from either column, and you can certainly add in some of your favorites, too. If a plant has (N) next to it, it means it’s native to our area.
Well, there you have it! You now know the basics for changing your lawn into something better. It’s time to dig in and make your own outdoors a vibrant ecological space! Enjoy.


PBS Wisconsin is a service of the Wisconsin Educational Communications Board and the University of Wisconsin-Madison. © 2026 All Rights Reserved.
What do you think?
I would love to get your thoughts, suggestions, and questions in the comments below. Thanks for sharing!
Benjamin Futa
The author has turned off comments for this article.